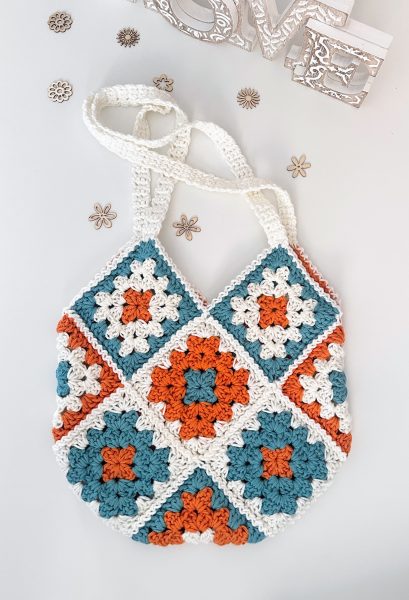
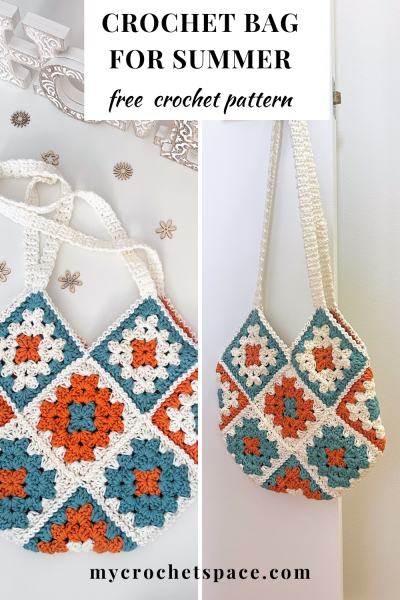
Thinking about making a granny square bag for summer? The Coastal Granny Square Bag is bright, cheerful, and such a fun project. It’s perfect for beach days, market runs, or just adding a bit of colour to your everyday look.
Get the ad-free & print-friendly version with step-by-step photos and written instructions from my Etsy or Ravelry stores.
This free crochet pattern is made up of 13 classic granny squares in cheerful sun and sea-inspired colours. It’s the kind of project that brings summer vibes and makes you think of warm days and ocean breezes.
What I love most about this granny square bag is its cheerful and summery feel. The colours remind me of sunny days by the water, bright, fresh, and just fun to look at.
At first, I wasn’t sure if these colours would work together, but they were the only ones I had in worsted-weight cotton, so I went with them, and I’m so glad I did!
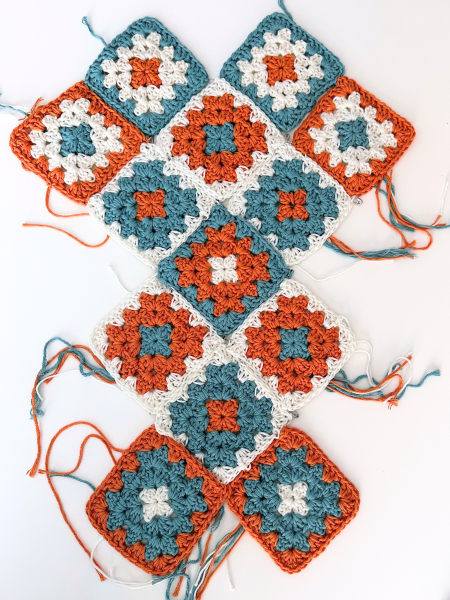
The granny squares are fun and quick to make. You’ll need to make 13 granny squares in total, and each square takes about 15 minutes to make.
I didn’t plan the order of colours too much because I didn’t want the bag to look too matchy-matchy. Sometimes I’d start with white in the centre, then orange and blue, or mix it up the other way around. My favourite ones are the squares with white as the last round, they really stand out!
If you’ve never made granny squares before, they’re worked from the centre outwards in the round. You can change colours each round or keep the whole square in one colour; it’s totally up to you! For mine, I did one round in one colour, then two rounds in another, and finished with a third colour for the last round, so each square has three colours in total.
The squares come together easily, and it’s a great project to take on the go since each one is made separately and doesn’t take up much space. Once you’ve finished all 13 granny squares, you can seam them together. That part is fun too because you get to see the bag finally take shape.
The 13 square bag has a lovely oval shape that looks really cute and quite pretty. I like the size because it’s not too big and not too small, just right for carrying a few essentials when you’re out and about. If you want to make a larger bag for groceries or as a market tote, you can simply make the squares bigger by adding one more round.
Choosing Yarn for Your Granny Square Bag
You can use any 100% cotton yarn in worsted weight (medium #4 / 10ply / Aran) for this project. I used a mix of colours from my stash, mostly leftovers! The orange and blue are Abbey Road Kung Fu Cotton in Fanta and Aqua, and the white is an unknown cotton (the label’s gone!) that feels a bit softer and slightly thinner than the others. It still worked well, even with the slight difference in thickness.
This granny bag is a great project for using up all your scrap yarn! Since you can change colours in each of the granny squares every round, you only need a little bit of yarn for one round.
If you’re looking for substitutes, try Paintbox Yarns Cotton Aran, Lily Sugar’n Cream, Drops Paris, or Hobbii Rainbow Cotton 8/8. Just make sure they’re all roughly the same thickness. Mixing brands is totally fine for a project like this. Granny squares are very forgiving!
Colour Changes
I made each granny square with four rounds using three different colours. I started with one colour for round one, then used a second colour for rounds two and three, and finished with a third colour for the last round. There’s no right or wrong way to do it. If you’re using scrap yarn, simply use whatever colours you have and mix them up in any order and get your creativity flowing. It’s a great way to use up leftovers and make each square a little different.
Pin this to your Pinterest Crochet Board for later!
Coastal Granny Square Bag Pattern
Skill level
Intermediate.
Materials
- 100% cotton yarn, worsted weight (medium #4 / 10ply / Aran) in 3 colours
- Approx. 300 yds (275 m) total
- Main colour (white): approx. 160 yds (145 m)
- Accent colours: approx. 70 yds (65 m) each
- Yarn pictured: Abbey Road Kung Fu Cotton in Fanta and Aqua
- Crochet hook: 5mm (and 4mm for seaming)
- Scissors
- Yarn needle (for weaving in ends)
- Safety pins (optional, to keep the layout for seaming)
Abbreviations (US Terms)
Ch = chain
St = stitch
Sl St = slip stitch
SC = single crochet
DC = double crochet
DC cluster = three double crochet stitches worked in the same stitch
Finished Size
Bag width: 11″ (28cm)
Bag length without handles: 11.5″ (29cm)
Gauge
One granny square (4 rounds) measures 4″ x 4″ (10cm x 10cm)
Pattern Notes
- The Ch 2 at the beginning of a row counts as the first stitch.
- Colour changes: There are four rounds in three different colours, starting with one colour for round 1, then the second colour for rounds 2 and 3, and the third colour for the last round. You can use any colour in any order, but keep in mind that your bag will have a different look.
Instructions to make granny squares
Round 1: Chain 3 and work a DC into the first Ch you made (which is also the third Ch from the hook). Work another two DC into the same Ch. Then, *Ch 1 and work another DC cluster (three double crochet stitches) into the same stitch. Repeat from * two more times. You should have four DC clusters in this round. Ch 1 and Sl st to the top of the first St in this round. (There are detailed step-by-step photos in this Granny Square post in case you need a visual guide)
Round 2: Ch 2 (counts as the first stitch), turn. Work two DC stitches in the first space between the DC clusters. Ch 1, and work another DC cluster into the same space. Then, *work a DC cluster into the next space, Ch 1, and another DC cluster into the same space. Repeat from * around. Sl st to top of first St. (8 clusters)
Round 3: Ch 2, turn. Work two DC stitches in the first space between the DC clusters. Work a DC cluster into the next space, Ch 1, and work another DC cluster into the same space. Then, *work a DC cluster into the next space, DC cluster into the next space, Ch 1, DC cluster into the same space. Repeat from * around. Sl st to top of first St. (12 clusters)
Round 4: Ch 2, turn. Work two DC stitches in the first space between the DC clusters. Work a DC cluster into the next space, Ch 1, and work another DC cluster into the same space. Then, *work a DC cluster into the next space, DC cluster into the next space, DC cluster into the next space, Ch 1, DC cluster into the same space. Repeat from * around. Sl st to top of first St. (16 clusters)
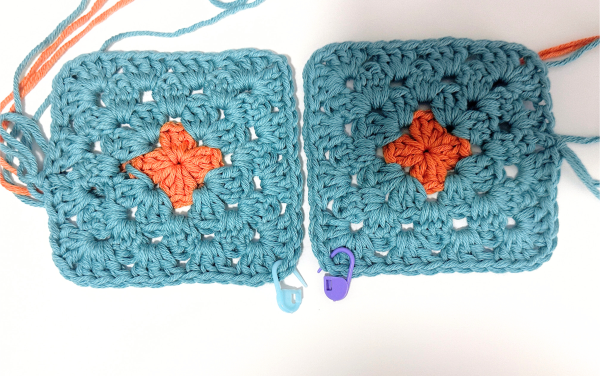
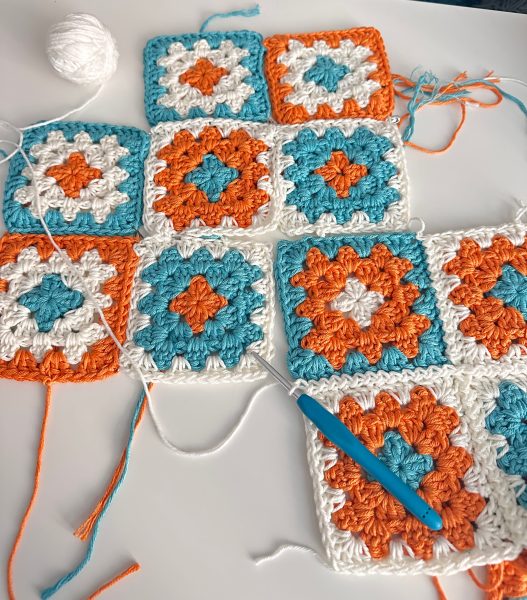
Make 13 granny squares.
Constructing the Granny Square Bag
For the seaming, we’ll use a 4mm crochet hook and white yarn, joining the squares together with slip stitches.
You can join your granny squares whichever way you like. I have chosen the slip stitch method, where the seam is not a straight line but a playful zig-zag.
Lay out all 13 granny squares in the exact order shown in the photo below, with all the yarn ends facing down, which will be the wrong side of the bag. Use safety pins if necessary to keep the squares in place and avoid mixing up the layout.
Here’s a simplified, numbered diagram to make it easier for you to put the layout together.
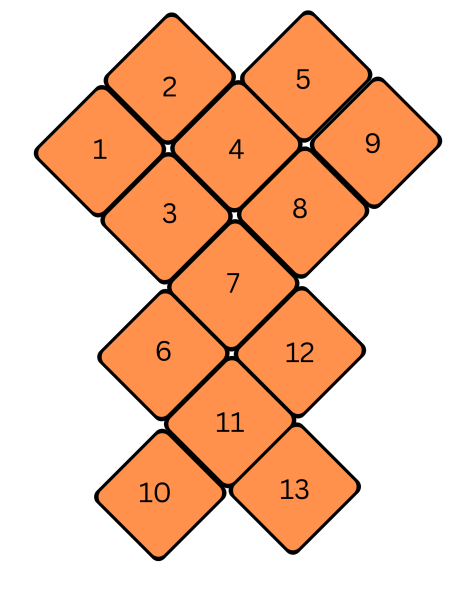
Working on the right side of the bag, make a slip knot. Line up the two granny squares you want to start joining. Insert your hook front to back into the corner space of the first square (between the clusters, under the chain-1 space, see photo below marked with markers) and make a slip stitch. Then insert the hook into the same corner space on the second square and make another slip stitch to connect them.
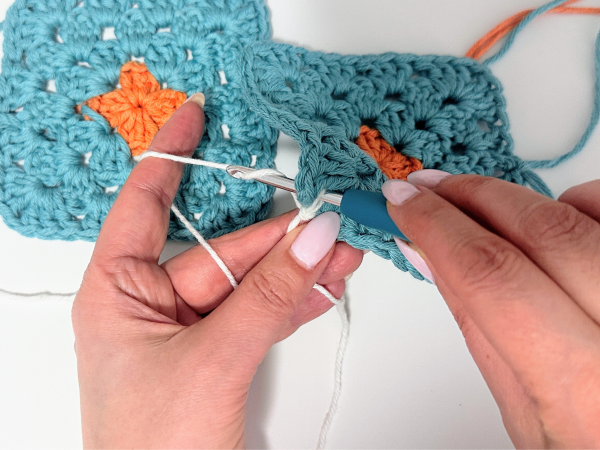
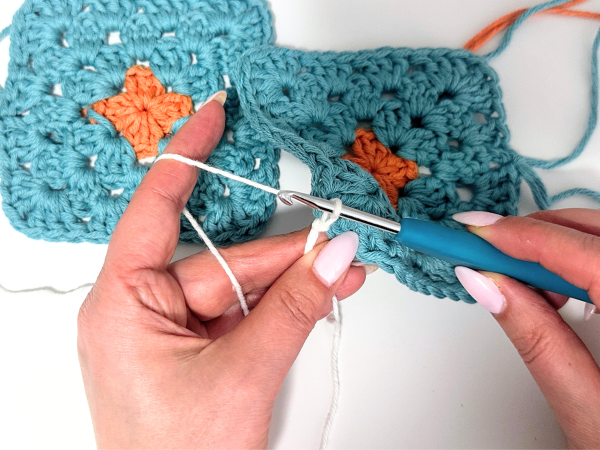
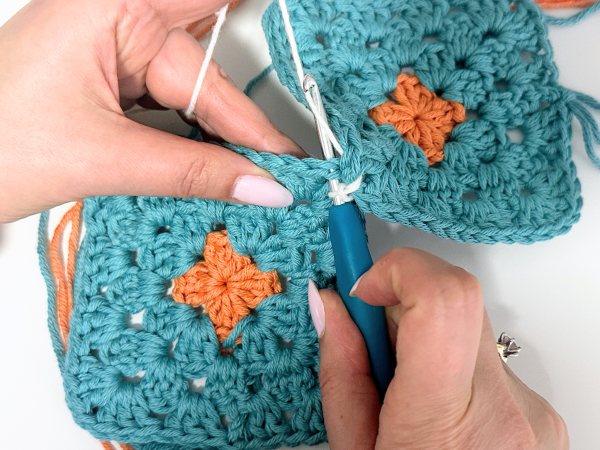
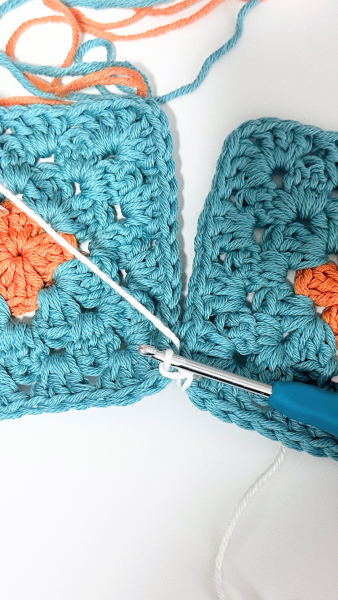
Then, insert your hook into the second stitch on the first square and make a slip stitch, then into the second stitch on the second square and slip stitch again. Then the third stitch on the first square, make a slip stitch, the third stitch on the second, make a slip stitch, etc. Continue working this way, one stitch at a time, all the way across until you’ve joined all the squares, making sure you’re joining from corner to corner each square.
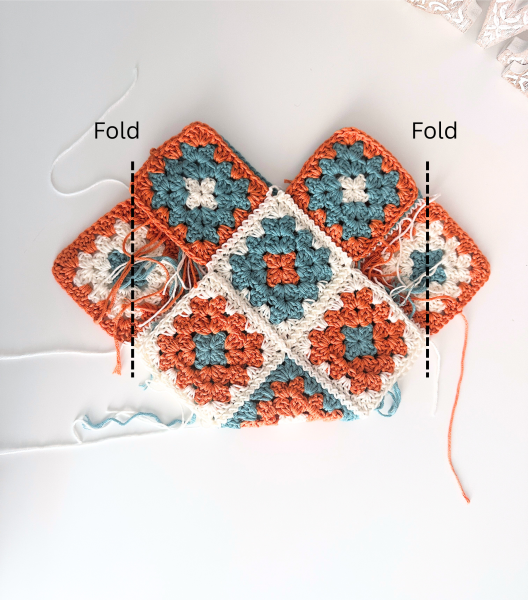
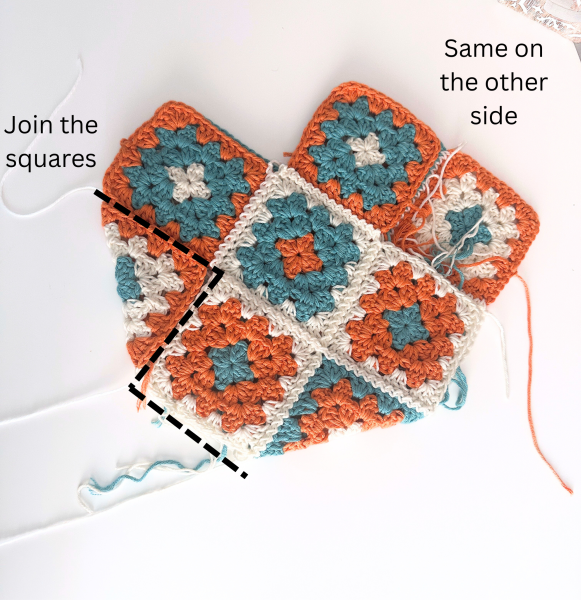
Once all the squares are joined, turn your work so the wrong side is now facing you. Fold the piece in half at the centre line, as shown in the diagram below, so that the right side is facing you now. The grey squares mark the top edges of the bag. Make sure they line up evenly, as this is where the handles will be attached.

Fold the squares on each side inward and align all the sides of the squares to form the shape of the bag. Then, seam all the remaining open edges in the same way, using slip stitches, until the entire bag is fully enclosed.
Border
With white yarn and a 5mm hook, and with the right side of the bag facing you, make a slip knot and join your yarn at the top corner, where the handle will be placed. Look for the chain-1 space between the clusters at the corner, then move over one double crochet to the side. That’s where you’ll start your first stitch (you can check the photo below to see exactly where).
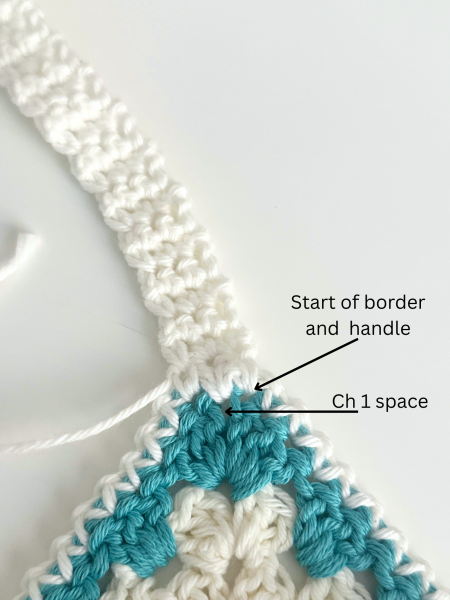
Chain 1, then make a slip stitch into the same stitch. *Chain 1, slip stitch into the next stitch. Repeat from * all the way around the top edge of the bag. When you reach the beginning, slip stitch to first stitch to join the round.
Handles
The handle will be 3 single crochet stitches wide. The second stitch, the middle one, should be placed directly into the chain-1 space at the corner.
Row 1: Ch 1, work a SC into the first stitch and into each of the next two stitches. Align the three SC stitches so that they are right on the top corner and equally spread out along the top (3 SC)
Row 2: Ch 1, SC into first St and each of the other two stitches. (3 SC)
Row 3: Repeat Row 2 until your strap measures about 25 inches (64 cm), or until you have 92 rows, or adjust to your preferred length.
Then attach the handle to the other top point of the bag (make sure it’s the right top, on the same side), making sure it’s centred, as shown in the photo. I used a yarn needle to sew it on. Just fasten off, cut the yarn, and stitch the end of the handle in place. Make sure the handle isn’t twisted before you start sewing. Go back and forth a few times to secure it well, then weave in the ends.
Repeat the same steps for the other side of the bag to attach the second handle. It’s a good idea to count the number of rows in the first handle and also measure the length to make sure both handles are the same. Sometimes our tension can change without us noticing, so counting the rows and checking the length helps keep everything even.
Weave in all ends on the inside of the bag. Done!
Get the ad-free, beautifully formatted version of the Coastal Granny Square Bag pattern with step-by-step photos and written instructions from my Etsy or Ravelry stores.

To weave in ends or not to weave in? Some people skip it and just tie the knots to keep everything secure, especially if they are lining the bag. And you can. But while that might work, I still prefer to weave in the yarn ends, even though I’m planning to line this bag (and I definitely recommend lining it, especially if you’ll be carrying small things like keys or pens that could slip through the gaps).
Granny stitch has lots of little spaces, and loose ends tend to poke through over time, even with a lining. I like to do things properly the first time, so I don’t have to go back and fix them later. To keep things tidy, I pull all the yarn tails to the inside of the bag, turn the bag inside out, and weave all the yarn ends in. Try to weave each tail into the matching colour section of the square so it blends in nicely.
Yes, it’s a lot of ends, I know! But let’s accept that it’s part of the process. Grab a cup of tea or coffee, put on a good podcast or something cozy to watch, and take your time. It’s one of those slow but satisfying steps that really makes your project feel finished. You don’t have to be super thorough if you’re adding a lining, but do make sure all the knots are secure and that the yarn is tucked in well so it won’t come undone later. Then trim the excess yarn and move on. It might take a bit, but it’s totally worth it! 🙂
And if you’re planning to line your bag, I highly recommend this YouTube tutorial by Erica Arndt. She explains how to line a square crochet bag, and in the second half of the video, she shows the exact shape of this one!
I hope you like this fun and cheery granny square bag pattern! If you share your makes from my patterns on Instagram, don’t forget to tag me @my_crochet_space, I would love to see them!