Last updated: June 9, 2026
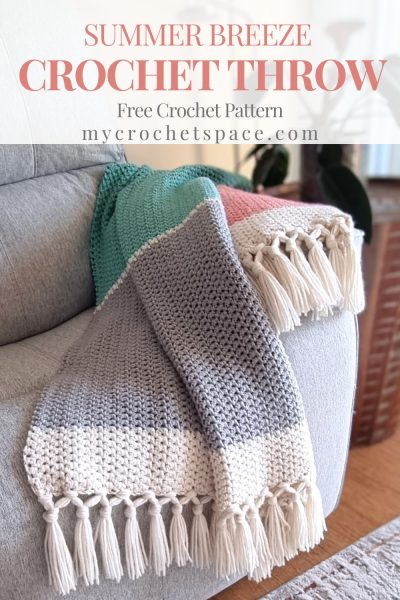
Snuggle up this summer with the Summer Crochet Throw!
Looking to add a touch of summer charm and cozy comfort to your home? Look no further than the Summer Crochet Throw! It’s the perfect project to enjoy during those cool summer nights, and it’s guaranteed to bring a smile to your face. With its beautiful design and relaxing vibe, this crochet throw will make any space feel warm and inviting. 🙂
This post may include affiliate links, view my disclosure policy for details.
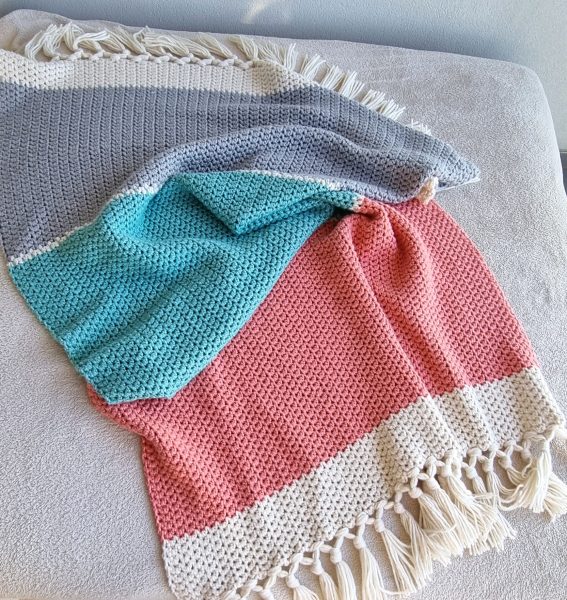
Made with an easy crochet stitch, this project is not only relaxing and enjoyable to make but also creates a lovely texture!
About the Stitch Used in This Crochet Throw
So, for the Summer Crochet Throw, I went with the crochet Spike stitch. It’s an easy stitch that’s easy enough for advanced beginners. I’ve used this stitch before to make these mug rugs but I used this stitch in a slightly different way. It’s a versatile crochet stitch that creates an interesting texture and different looks depending on how many colours you use.
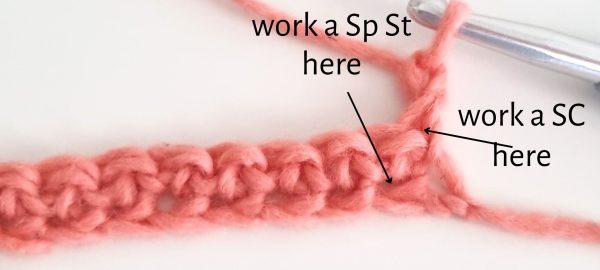
To create the Spike Stitch (single crochet), you’ll be crocheting a single crochet stitch one or more rows below the current row. So, instead of inserting your hook into the next stitch as usual, you’ll insert it into the row below and work a regular single crochet stitch.
Using the spike stitch may require slightly more yarn compared to using only regular single crochet stitches. This is because you are essentially crocheting some stitches twice by inserting the hook in a previous row.
The amount of yarn used depends on the pattern and frequency of the spike stitch used. You can use spike stitches sparingly to add interesting pops of colour or use them more frequently for a unique texture. For this crochet throw pattern, the spike stitch is used every second single crochet stitch.
About the Yarn
I made this crochet throw using the Snuggle Puff cotton blend yarn by WeCrochet. This yarn is incredibly soft and perfect for blankets and throws. It has a fluffy feel that’s just perfect for snuggling up. I enjoyed working with this yarn, and I love all the colours they have available!
Frogging can be tricky, so take it easy. It’s best to crochet loosely with a larger hook, so if you need to undo any stitches, you can do it slowly by pulling them out one by one. This yarn is so fluffy that it can easily become entangled if you’re not careful. Other than that, I had no issues using it. I absolutely love how soft and snuggly it is, and it created a beautiful and airy summer throw.
Summer Crochet Throw
Scroll down for the free crochet pattern or get the ad-free & premium PDF pattern with step-by-step photos and written instructions from my Etsy or Ravelry stores.
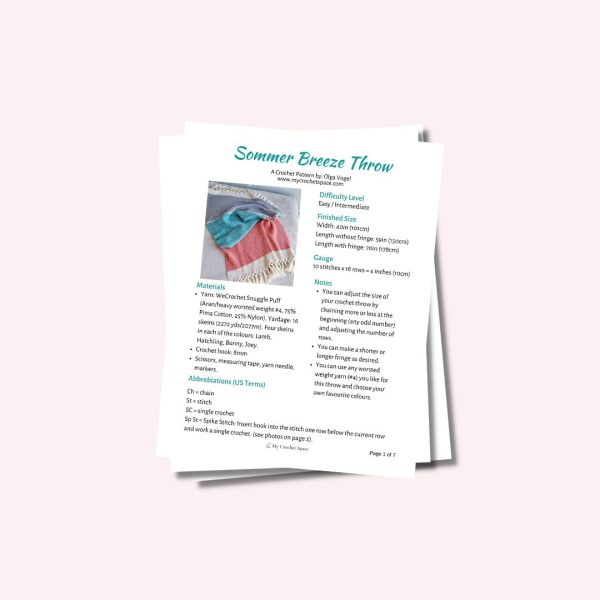
Summer Crochet Throw Pattern PDF
Whether you’re a seasoned crocheter or just starting out, the Summer Crochet Throw is the perfect project to add to your spring to-do list. It’s easy, relaxing, and produces a beautiful finished product that’s sure to brighten up any room or outdoor space. Get your yarn and hook ready, and let’s get crocheting!
Pin this easy summer crochet throw pattern to your Pinterest Crochet Board for later!
Crochet Throw Free Pattern
Difficulty level
Easy
Finished Size
Width: 40in (101cm)
Length without fringe: 59in (150cm)
Length with fringe: 70in (178cm)
Gauge
10 stitches x 18 rows = 4 inches (10cm)
Materials
Yarn: WeCrochet Snuggle Puff (Aran/heavy worsted weight #4, 75% Pima Cotton, 25% Nylon). Yardage: 16 skeins (2272 yds/2077m). Four skeins in each of the colours: Lamb, Hatchling, Bunny, Joey.
Or any worsted weight #4 yarn of your choice.
Crochet hook: 8mm
Additional tools: Scissors, measuring tape, yarn needle, markers.
Abbreviations (US Terms)
Ch = chain
St = stitch
SC = single crochet
Sp St = Spike Stitch: Insert hook into the stitch one row below the current row and work a single crochet.
Pattern Notes
- You can adjust the size of your crochet throw by chaining more or less at the beginning (any odd number) and adjusting the number of rows.
- You can make a shorter or longer fringe as you desire.
- You can use any worsted weight yarn (#4) you like for this throw and choose your own favourite colours.
Instructions
Ch 101 or any odd number until you reach your desired width. (I started with the colour Lamb)
Note: It’s a good idea to chain slightly more than the desired width. I suggest adding 5-7 inches extra to the chain. For instance, my 101-chain measured 47 inches initially but reduced to about 40 inches as I progressed with the throw.
Row 1: SC in second Ch from hook and across the row (total 100 Sts).
Row 2: Ch 1, turn. *SC in first, Sp St in second. Repeat from * across the row. The last St should be a Sp St. (100 Sts) Ch 1 and turn.
Row 3: repeat row 2 until you reach your desired length.
Colour Changes
Each skein of yarn produced approx. 17-18 rows, depending on your tension. I have changed colours when I finished the whole skein of that colour (or four skeins in the middle part of the throw). I also added two rows of Lamb colour in between for a little bit of contrast and to separate the other colours. See below:
- Start of throw – Lamb 1 skein
- Bunny 4 skeins
- Lamb 2 rows
- Hatchling 4 skeins
- Lamb 2 rows
- Joey 4 skeins
- Finish: Lamb 1 skein
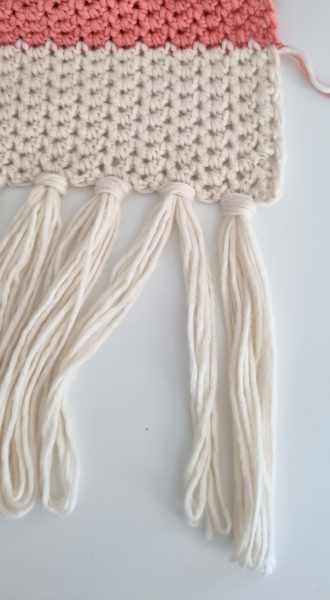
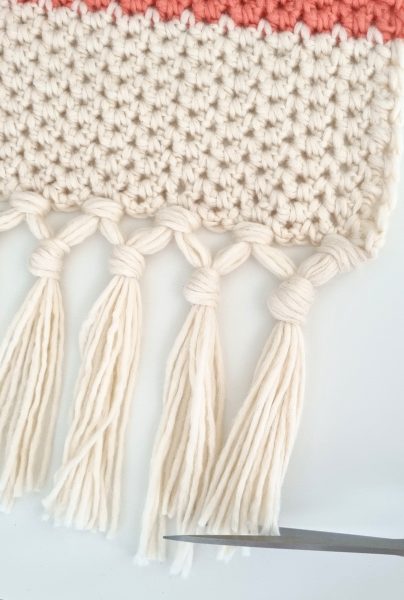
Fringe / Tassels
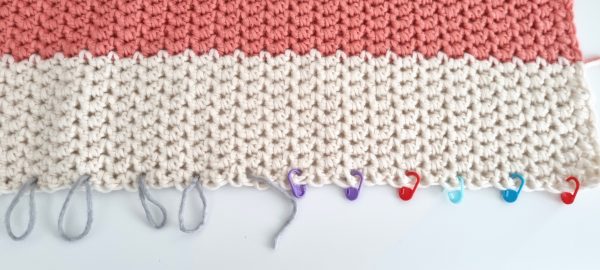
To create the tassels, we’ll be using the remaining Lamb colour, which should be around two skeins (minus the usage for the four rows between the colours). You’ll need to make a total of 50 tassels, with 25 on each side of the throw.
To make sure they’re evenly spaced, insert markers (or use a strand of yarn if you don’t have markers) into the stitches where you want to place each tassel. This will help you distribute them equally on both sides.
In this pattern, it’s about every second Spike stitch, see photo below.
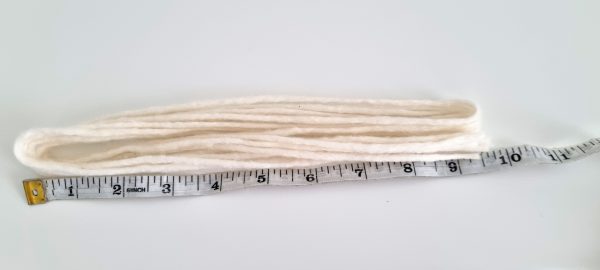
To create a single tassel, cut four pieces of yarn, each around 39.5 inches (1m) long.
Next, fold the 4 strands in half, and then fold them in half again, making sure all the ends are lined up. The tassel should now measure approximately 9.5 inches (24cm).
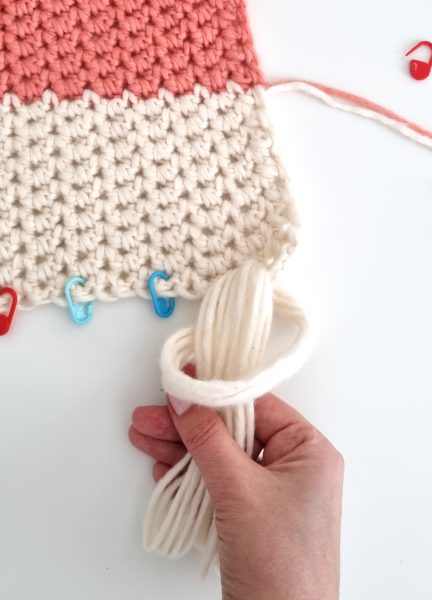
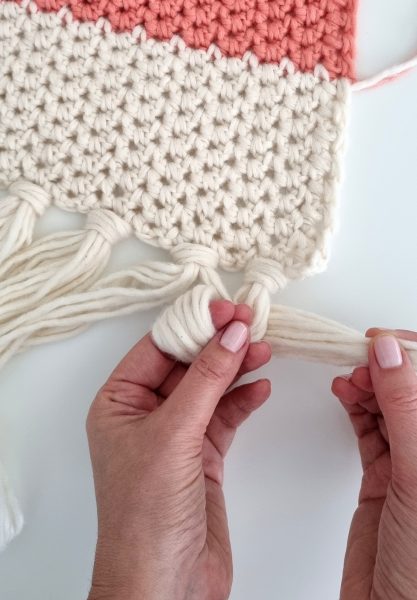
To attach the tassels to your Summer Crochet Throw, insert your hook into the spot of the first tassel and pull the loop through.
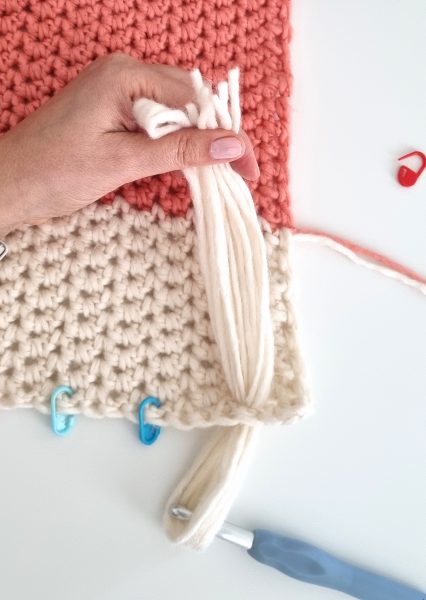
Then, take the end of the tassel and pull it through the loop. Pull the ends loosely to make a knot. Repeat this process for all tassels.
Making Knots
Once you’ve attached all of the tassels to your Summer Crochet Throw, it’s time to start making those knots. Here’s how to do it: First, take the first tassel and half of the second tassel and tie a knot about an inch away from the beginning of the tassels. Next, take the rest of the second tassel and half of the third tassel and tie another knot. As you make each knot, you can adjust them a bit to make sure they’re lined up perfectly.
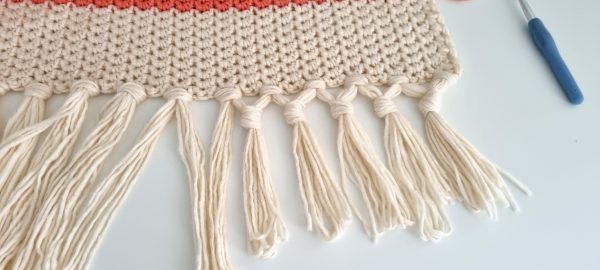
Remember to keep the knots loose at first so you can adjust them if necessary. Once you’re happy with the placement, you can tighten them up a bit more. And don’t worry if you don’t like how a knot looks – you can always undo it and try again. Just keep playing around with it until you’re happy with how everything looks. And before you know it, you’ll have a gorgeous crochet throw with perfectly aligned tassels and knots!
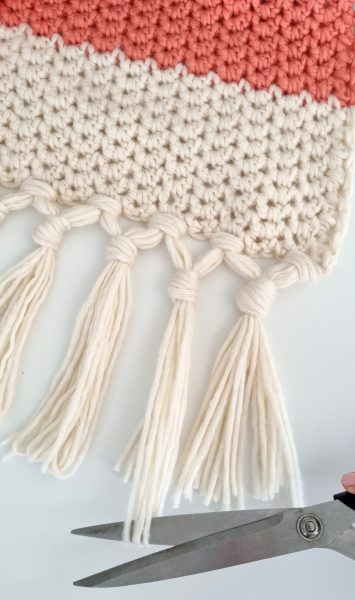
And with the knots all done, there’s only one more step left to complete your Summer Crochet Throw! Now it’s time to make sure all the tassels are the same length. For my throw, I made the tassels around 4 inches long, but you can adjust them to your liking. Personally, I love the look of long tassels, but it’s all up to you!
Here’s how to do it: Start by cutting all the loops to release the strands, and then straighten them all out before cutting them to the desired length. This will ensure that they’re all even and tidy, and will give your throw that perfect finished look.
And that’s it – your Summer Crochet Throw is complete and ready to enjoy!
Oh, wait… there’s one more step to go – weaving in all the ends! But that’s a quick and easy task that will make your crochet throw look amazing.
I hope you had as much fun making this throw as I did, and I’d love to hear your thoughts in the comments below.
If you want even more detailed instructions and pictures, check out the printable PDF version of this pattern available on Etsy and Ravelry. By getting the PDF, you can easily print it out, save it on your computer, and refer to it anytime without being interrupted by ads. Plus, you’ll always have it on hand whenever you want to make another one of these beautiful throws.
Enjoy, and Happy Crocheting!
[mailerlite_form form_id=2]
4 replies on “Summer Crochet Throw”
Oh my goodness! Your Summer Breeze Crochet Throw is just gorgeous! I love your color choices, the stitch, the amazing tassels! And your description of the yarn made me almost drool!
Thank you so much for sharing this in the Spring Into Summer Blog Hop. I can’t wait to make one.
Teri
Thank you so much, Teri!
I’m glad you like the throw, and I hope you have fun making one for yourself! 🙂
Hi Olga, I love your finished summer crochet throw! It looks so soft and cozy ♥ Thank you for linking up at our weekly Link Party! You are being featured at our Wednesday
Party #502 this week. Here’s the direct link to the post in case you’d like to share your feature:
https://oombawkadesigncrochet.com/summer-throw-guide-to-crochet-code-sky-scarf-link-party-502/
Hope to see you again next week! Rhondda
That’s awesome! Thank you, Rhondda! 🙂