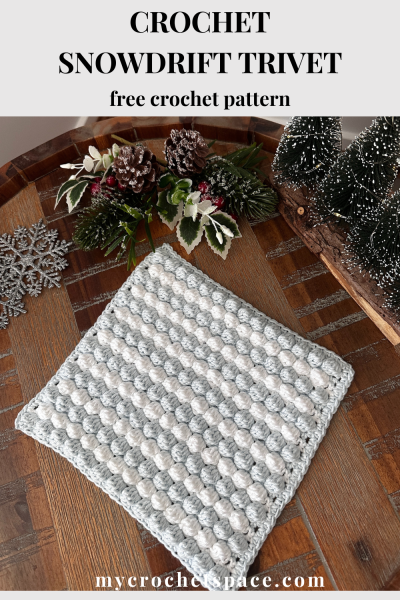
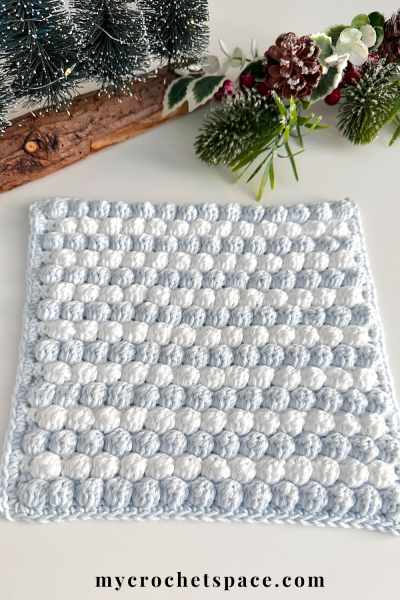
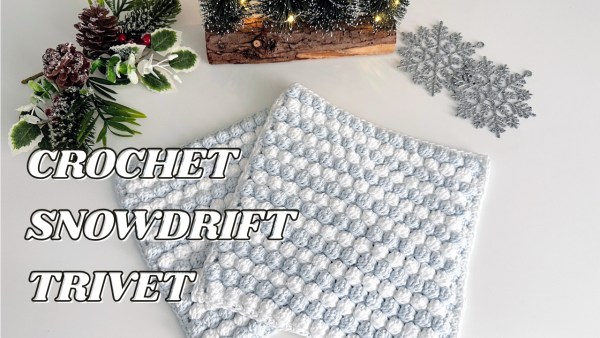
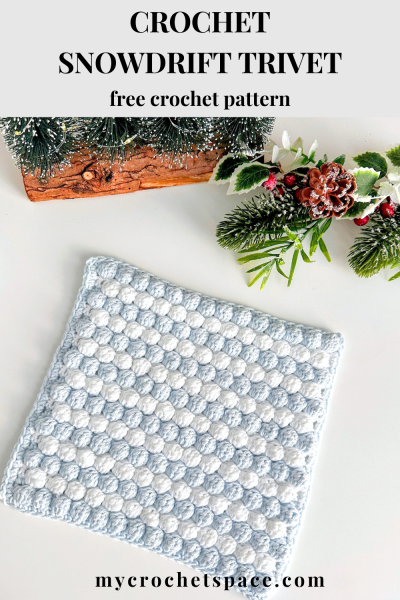
The Snowdrift Crochet Trivet has this thick, squishy texture that’s perfect for hot dishes and keeping your table safe.
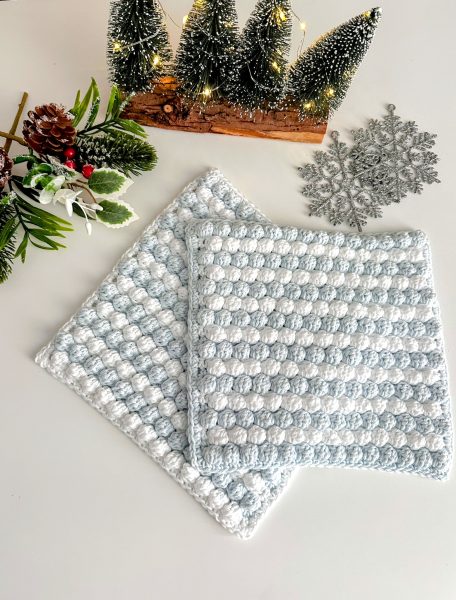
And since winter is almost here (and I absolutely love snow!), I picked colours that look like soft little snowdrifts.
I’m planning to make a bunch of these as Christmas gifts for family and friends. They’re such a quick little afternoon project, the kind you can sit down with for a few relaxed hours and have completely finished by the evening. It’s so satisfying when something comes together that fast!
Just grab some cotton yarn from your stash, make yourself something warm to sip, and settle in for a cozy moment. Before you know it, you’ll have a lovely handmade gift all ready to go. Perfect for those last-minute makes, too. 😊
The gorgeous bumpy texture comes from bobble stitches, and all that raised, squishy goodness does use a fair bit of yarn.
Bobbles are known to be yarn-eaters, after all! This isn’t a flat, lightweight cloth. It’s about three times thicker than a regular washcloth, and that cozy thickness naturally needs a little extra yardage. 😊
About Yarn
You’ll need 100% cotton yarn (#4 weight) for this trivet, and I used Dishie yarn in two colours. I made two trivets from two skeins in total, the same two colours you see in the photo.
So if you’re making one trivet in two colours like mine, you’ll only need about half a skein of each. And if you prefer a single-colour version, one skein will be enough. 😊
About Bobble stitch
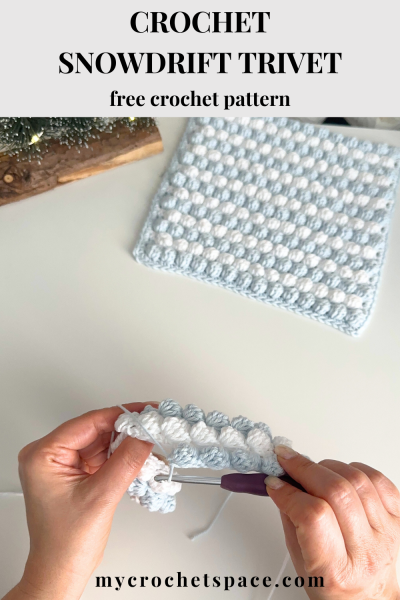
Bobble stitches are fun, super versatile, and just so pretty! They do take a little longer to work since you’re essentially making five stitches into one to form each bobble.
And if you’re new to bobbles, just a quick note: they appear on the reverse side as you work them. They only pop out after you make the single crochet that follows the bobble.
I designed the bobbles to be slightly offset from row to row, so they’re not stacked directly on top of each other. This creates a 4-row repeat pattern. You’ll also be switching colours every two rows once you start the bobble stitch section.
To make one bobble stitch: *yarn over, insert hook into the specified stitch, yarn over and pull up a loop (you’ll have three loops on hook). Yarn over and pull through two loops on hook (two loops left on hook). Repeat from * working into the same stitch 4 more times, you’ll have six loops on hook. Yarn over and pull through all six loops. Watch a short video demonstration here.
Crochet Trivet Pattern
Get the ad-free & print-friendly version with step-by-step photos and written instructions from my Etsy or Ravelry stores.
Share or pin this pattern to your Pinterest crochet board for later!
Difficulty
Easy
Finished Size
8.5″ x 8.5″ (22cm x 22cm)
Gauge
7 sts x 8 rows = 2″ (5cm) in pattern
Abbreviations (US Terms)
- Ch = chain
- St = stitch
- Sl St = slip stitch
- SC = single crochet
- BO = bobble stitch
Bobble stitch: *yarn over, insert hook into the specified stitch, yarn over and pull up a loop (you’ll have three loops on hook). Yarn over and pull through two loops on hook (two loops left on hook). Repeat from * working into the same stitch 4 more times, you’ll have six loops on hook. Yarn over and pull through all six loops. Watch a short video demonstration here.
Materials
- Yarn: Dishie, worsted weight #4, 100% cotton, 1 skein in White and 1 skein in Wisp (light blue).
- I used about half of each skein for one trivet
- If using one colour, 1 skein is enough
- Total yarn needed for one trivet: 190yds/173m
- Crochet hook, size 5 mm
- Scissors and a yarn needle for weaving in the ends.
Pattern Notes
- Chain 1 at the beginning of a row is a turning chain and does not count as a stitch.
- To make the trivet larger or smaller, chain any even number of chains for the width and work until you have a square.
Instructions
Watch the video demonstration for a closer look at the stitches and how I change colours.
With Blue, Ch 30 or any even number for the width of the trivet.
Row 1 – Blue: SC in second Ch and each Ch across the row. (29 sts here and every row)
Rows 2 – Blue: Ch 1, turn. SC in first St, BO in next, SC in next, BO in next, repeat alternating SC and BO across the row, ending with a SC in last St.
Rows 3 – Blue: Ch 1, turn. SC in first St and each St across the row.
Row 4 – White: Ch 1, turn. SC in first St, SC in next St, BO in next, SC in next, repeat alternating SC and BO across the row, at the end of the row, the last three stitches will be BO, SC, SC in last St.
Row 5 – White: repeat row 3.
Repeat rows 2-5 until you have a square trivet or 16 BO rows, ending with a SC row.
Border
After the last SC row, Ch 2 and work another SC into the same corner stitch. Work along the first side with one SC in each row (about two per colour). At the corner, work SC, Ch 2, SC. Across the bottom edge, place one SC into each stitch. Repeat the same “one SC per row” along the second side. When you reach the start, Ch 2 and Sl st to the first stitch.
Fasten off and weave in ends.
Watch the Snowdrift Video Tutorial
Block your trivet by giving it a light spray of water, then pinning down all the corners and straightening the sides before letting it dry. It really makes a difference in how polished it looks!
I hope you like this festive trivet pattern! You can get a printable ad-free version of this pattern from my Etsy or Ravelry store.
Share or pin this pattern to your Pinterest crochet board for later!
More Crochet Trivet Potholder Patterns
- Trellis Mosaic Trivet
- Frosty Days Crochet Towel
- Winter Spruce Crochet Trivet
- Everyday Thermal Potholder
- Houndstooth Crochet Potholder