Last updated: May 15, 2026
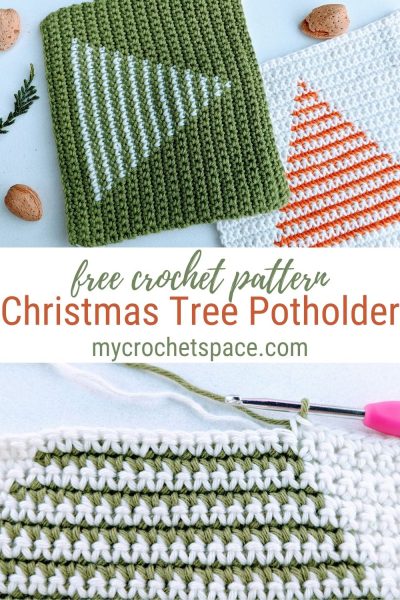
Christmas time is just around the corner, and it’s always fun to crochet a few festive potholders for family and friends. They’re quick, easy, and such a lovely little project to get you into the holiday mood!
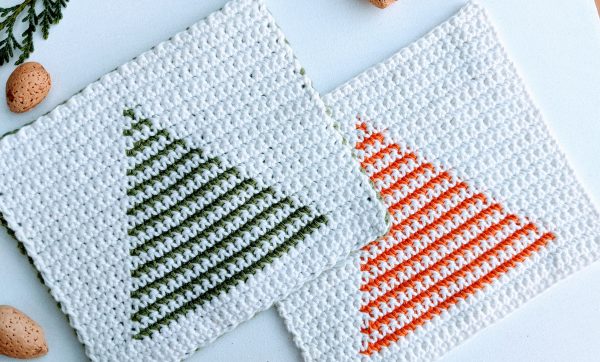
This Christmas potholder is quite simple to make since the main stitch is just Single Crochet.
The only little challenge is the colour change and carrying the yarn – and once you know how, it’s really easy. If you’re already confident with colourwork, feel free to scroll straight down to the free pattern!
And if you’ve never switched colours before, no worries at all. I recorded a video showing exactly how I do the colour change – you’ll find it at the bottom of the page.
This pattern is designed so both sides look neat — no yarn strands running across the back and no extra ends to weave in. The non-working yarn is carried along as you go, so you won’t see any long floats or loose strings on the reverse side.
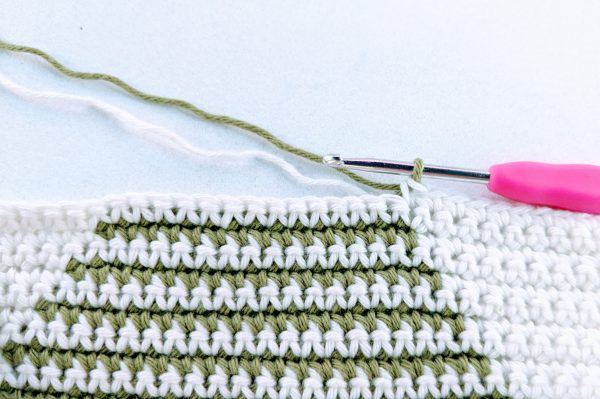
You’ll only have one yarn end at the very top of the Christmas tree, which you can simply weave in or pull through to the other side.
Stitches used:
Single Crochet
Materials:
Yarn: 100% Cotton 8 ply/DK/3/Light Worsted (1 skein in white and 1 skein in green)
Hook: 3.5mm (E-4)
Yarn needle
Scissors
Dimensions:
17cm x 15cm (6.75” x 6”)
Gauge:
20 stitches x 23 rows in pattern = 4″
Abbreviations:
Ch = chain
St(s) = stitch(es)
SC(s) = single crochet(s)
MC = main colour
CC = contrasting colour
Pattern Notes:
- Ch 1 at the beginning of the row does not count as a stitch
- Always carry the MC if not in use
- Carry CC as shown in the video
Written Instructions:
Ch 34 with MC (main colour)
Row 1: SC in the second chain from hook and across the row (total 33). Ch 1 and turn.
Row 2-4: SC in the first stitch and across the row. Ch 1 and turn.
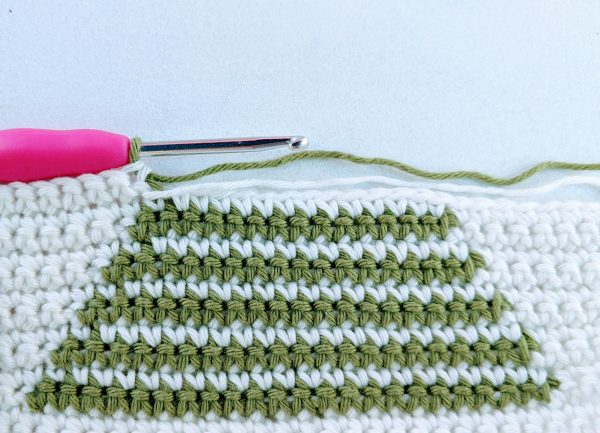
Row 5: This is where we begin the Christmas tree, working it from the bottom up.
SC in each of the first 5 stitches, changing to the CC in the middle of the 5th stitch (you can see this in the video at the bottom of the page).
Work SC in the next 23 stitches, carrying the MC and crocheting over it as you go.
Change back to MC in the middle of the 23rd stitch, leaving the CC at the back.
Then continue with MC and work SC in the next 5 stitches. Ch 1 and turn.
Row 6: SC in first and each St across with MC. When you reach the 6th stitch, pick up the CC (just like in the video) and carry it along until you reach the second-last CC stitch from the previous row. Drop the CC to the front, then finish the row with SC in each remaining stitch. Ch 1 and turn.
Note: To keep things simple, I’ll only list the number of stitches in each colour for every row. The instructions for how to work them stay the same throughout.
Rows 5, 7, 9, 11, 13, 15, 17, 19, 21, 23 and 25 are the colour-change rows.
All rows in between are worked in the main colour (MC) while carrying the contrasting colour (CC), just like in the video.
Remember to always switch colours in the last step of the stitch before the colour change.
You can follow the stitch counts for each colour in the graph below (just click the image to enlarge it), or continue with the written instructions.
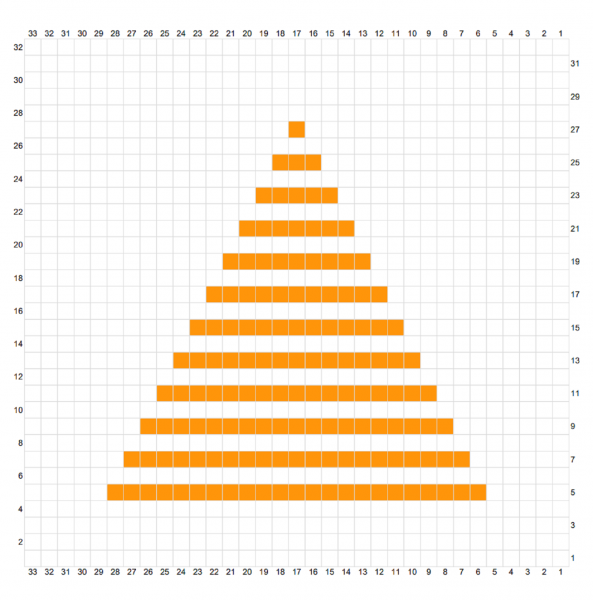
Row 7: 6 SC (mc), 21 SC (cc), 6 SC (mc). Ch 1 and turn.
Row 8: SC across in mc. Ch 1 and turn.
Row 9: 7 SC (mc), 19 SC (cc), 7 SC (mc). Ch 1 and turn.
Row 10: SC across in MC. Ch 1 and turn.
Row 11: 8 SC (mc), 17 SC (cc), 8 SC (mc). Ch 1 and turn.
Row 12: SC across in MC. Ch 1 and turn.
Row 13: 9 SC (mc), 15 SC (cc), 9 SC (mc). Ch 1 and turn.
Row 14: SC across in MC. Ch 1 and turn.
Row 15: 10 SC (mc), 13 SC (cc), 10 SC (mc). Ch 1 and turn.
Row 16: SC across in MC. Ch 1 and turn.
Row 17: 11 SC (mc), 11 SC (cc), 11 SC (mc). Ch 1 and turn.
Row 18: SC across in MC. Ch 1 and turn.
Row 19: 12 SC (mc), 9 SC (cc), 12 SC (mc). Ch 1 and turn.
Row 20: SC across in MC. Ch 1 and turn.
Row 21: 13 SC (mc), 7 SC (cc), 13 SC (mc). Ch 1 and turn.
Row 22: SC across in MC. Ch 1 and turn.
Row 23: 14 SC (mc), 5 SC (cc), 14 SC (mc). Ch 1 and turn.
Row 24: SC across in MC. Ch 1 and turn.
Row 25: 15 SC (mc), 3 SC (cc), 15 SC (mc). Ch 1 and turn.
Row 26: SC across in MC. Ch 1 and turn.
Row 27: 16 SC (mc), 1 SC (cc), 16 SC (mc). Ch 1 and turn.
Row 28-32: SC across in MC. Ch 1 and turn.
Make two of these squares, or make the back plain in whichever colour you like. Use the same number of chains (34), stitches (33) and rows (32).
Join both pieces together with a yarn needle, or slip stitch them along the edges — and that’s it!
Weave in all ends.
Hope you enjoyed it as much as I did making those potholders!
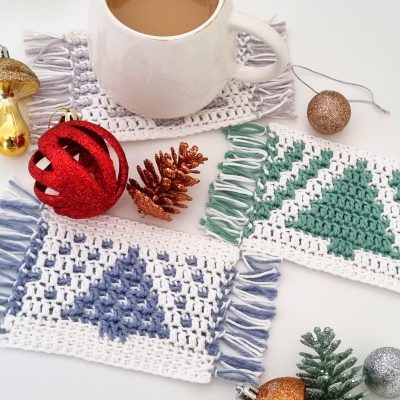
Looking for more Christmas crochet home decor? Check out these Christmas Tree coasters, they are fun & quick to make and use very little yarn!
More Free Crochet Patterns
- Crochet Snowflake Coaster Pattern
- 16 Crochet Potholder & Hot Pad Patterns
- 21 Small Crochet Projects for Last Minute Gifts
- 21 Quick Crochet Ideas
- 20 Quick Gift Ideas to Crochet
- 25 Beautiful One Skein Crochet Scarf Patterns
- Top 30 One Skein Crochet Projects
- 10+ Unusual Granny Square Crochet Patterns
- 10+ Free & Easy Crochet Fingerless Gloves Patterns
- 34 Free Crochet Baby Blanket Patterns
2 replies on “Crochet Christmas Tree Potholder”
Thank you very much for this wonderful pattern. Your explanations and the film are brilliant and very easy to understand. I am just going to make a pair in black and and can’t wait to see the result.
Best wishes to you
You’re very welcome! I’m so glad to hear you enjoyed the pattern 🙂 Wow, I haven’t tried it in black yet – that sounds interesting. I’d love to see how it turns out, please share your results!