Last updated: May 19, 2026
I love mosaic crochet! If you remember, I shared a couple of mug rug patterns using the mosaic technique before, and I just wanted to create something for winter.
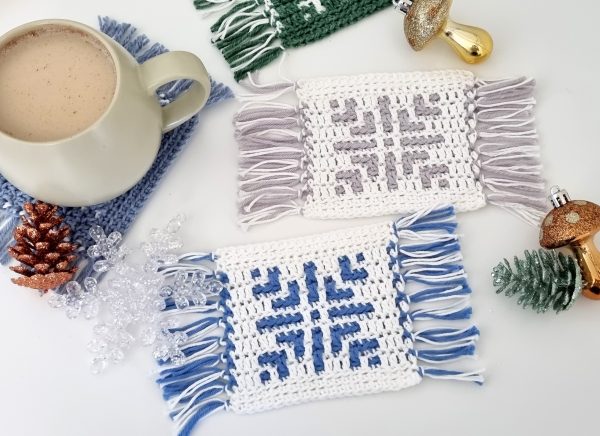
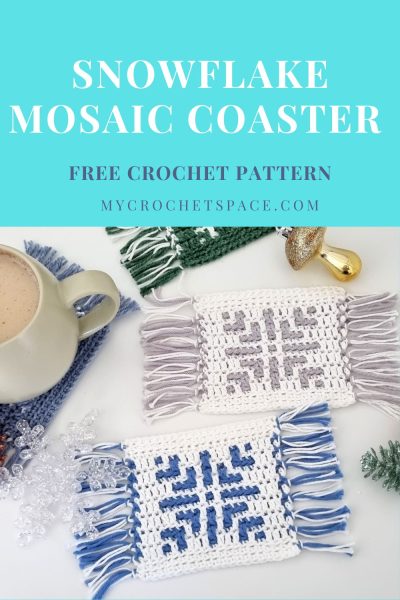
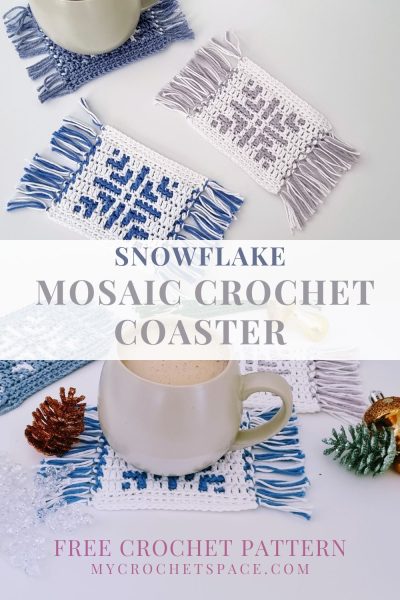
Christmas time is my favourite time of the year, and I love decorating my home with all the Christmassy things. Here is another addition to my mug rug collection – Crochet Snowflake Coasters!
Crochet Snowflake Coaster Free Pattern
Scroll down for the free crochet pattern, or get the ad-free & premium PDF pattern with step-by-step photos and written instructions from my Etsy or Ravelry stores. The printable PDF (8 pages) version of this pattern includes written instructions, a mosaic chart and detailed step-by-step photos.


This mosaic coaster pattern is also available as part of a mosaic pattern bundle here.
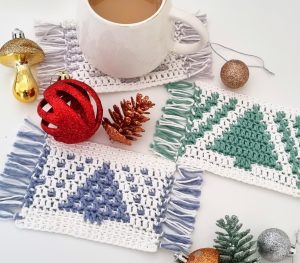
You might also like the Christmas Tree Coasters.
Skill Level
Intermediate.
This pattern is easy if you know how to use a mosaic graph and do basic mosaic stitches. If you need to refresh your memory on how to crochet the basic mosaic stitches, you can watch a video demonstration of my Mosaic Mug Rug here. It’s a different pattern, but the technique is the same. The video will show how to attach yarn when beginning a new row, how to work the single crochets in back loops only and the drop-down double crochets.
Materials
- -Yarn: 100% cotton yarn or a cotton blend, light worsted #3 / 8ply / DK (approx. 15yds/14m in each colour)
- I used Brighton 4 Seasons (50% cotton and 50% Acrylic) in Blue, Snow and Silver.
- Crochet hook 4mm (G)
- Scissors, yarn needle
Dimensions
Length without fringe: 4.5″ (11cm) and with fringe: 6.5″ (16cm)
Width: 4″ (10cm)
Gauge
9 Sts x 10 rows = 2″ in single crochet in back loop only
Abbreviations (US Terms)
Ch = chain
St(s) = stitch(es)
SC = single crochet
DC = double crochet
Blo = back loop only
Dd DC = drop-down double crochet
A and B = any two contrasting colours of your choice
Special Stitches
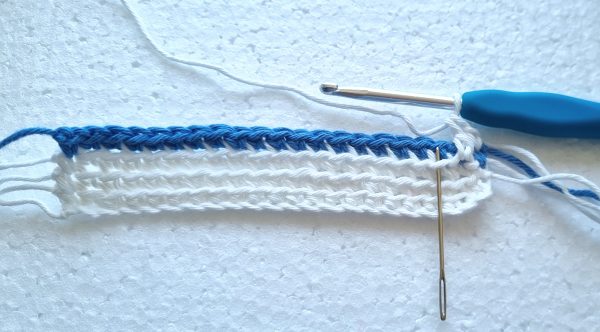
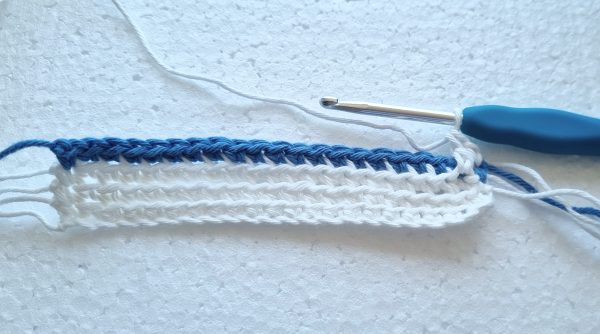
Drop-down Double Crochet: work a double crochet in the front loop of the stitch 2 rows below. In this pattern, you will work into the same colour front loop 2 rows below as the colour on your hook.
In the picture below, the white colour connects two rows below to the white colour again. And the blue colour will connect to blue in future rows.
Pin this crochet coaster pattern to your Pinterest Crochet Board for later!
Pattern Notes
- Each row is worked from right to left on the right side (no turning).
- At the end of each row, fasten off and cut the yarn, leaving approx. 2-inch tail.
- One colour per row. No need to change colour in the middle of a row.
- Each new row starts with a slip knot and joining a new colour to the first stitch in the previous row.
- The first and last stitches are normal single crochet stitches. All other single crochets are worked into the back loop only.
- In the written instructions, when you have a number in front of a stitch, that means you have to work that many of that particular stitch. For example, 5 SC in blo means you have to work one SC in blo in the next 5 stitches.
- You will have yarn ends on each side of your project. The ends will be used to make a fringe.
Crochet Snowflake Coaster Written Instructions
Ch 22 with A
Row 1: with A, SC in second Ch and across (21). Fasten off and cut the yarn approx. 2 inches away.
Row 2: with A, make a slip knot and attach yarn with a SC to the first St. SC in blo in each St across until the very last St, SC in last St. Fasten off and cut the yarn.
Row 3: with A, make a slip knot and attach yarn with a SC to the first St. SC in blo in each St across until the very last St, SC in last St. Fasten off and cut the yarn.
Row 4: with B, join with SC to first St. SC in blo in each St across until the very last St, SC in last St. Fasten off and cut the yarn.
Row 5: with A, join with SC to first St. 3 dd DC, SC in blo, dd DC, SC in blo, 3 dd DC, SC in blo, 3 dd DC, SC in blo, dd DC, SC in blo, 3 dd DC, SC in last. Fasten off and cut the yarn.
Row 6: with B, join with SC to first St. 5 SC in blo, dd DC, 3 SC in blo, dd DC, 3 SC in blo, dd DC, 5 SC in blo, SC in last. Fasten off and cut the yarn.
Row 7: with A, join with SC to first St. 3 dd DC, 3 SC in blo, dd DC, SC in blo, dd DC, SC in blo, dd DC, SC in blo, dd DC, 3 SC in blo, 3 dd DC, SC in last. Fasten off and cut the yarn.
Row 8: with B, join with SC to first St. 7 SC in blo, dd DC, SC in blo, dd DC, SC in blo, dd DC, 7 SC in blo, SC in last. Fasten off and cut the yarn.
Row 9: with A, join with SC to first St. 5 dd DC, 3 SC in blo, dd DC, SC in blo, dd DC, 3 SC in blo, 5 dd DC, SC in last. Fasten off and cut the yarn.
Row 10: with B, join with SC to first St. SC in blo in each St across until the very last St, SC in last St. Fasten off and cut the yarn.
Row 11: with A, join with SC to first St. 3 dd DC, 5 SC in blo, dd DC, SC in blo, dd DC, 5 SC in blo, 3 dd DC, SC in last. Fasten off and cut the yarn.
Row 12: with B, join with SC to first St. SC in blo in each St across until the very last St, SC in last St. Fasten off and cut the yarn.
Row 13: with A, join with SC to first St. 5 dd DC, 3 SC in blo, dd DC, SC in blo, dd DC, 3 SC in blo, 5 dd DC, SC in last. Fasten off and cut the yarn.
Row 14: with B, join with SC to first St. 7 SC in blo, dd DC, SC in blo, dd DC, SC in blo, dd DC, 7 SC in blo, SC in last. Fasten off and cut the yarn.
Row 15: with A, join with SC to first St. 3 dd DC, 3 SC in blo, dd DC, SC in blo, dd DC, SC in blo, dd DC, SC in blo, dd DC, 3 SC in blo, 3 dd DC, SC in last. Fasten off and cut the yarn.
Row 16: with B, join with SC to first St. 5 SC in blo, dd DC, 3 SC in blo, dd DC, 3 SC in blo, dd DC, 5 SC in blo, SC in last. Fasten off and cut the yarn.
Row 17: with A, join with SC to first St. 3 dd DC, SC in blo, dd DC, SC in blo, 3 dd DC, SC in blo, 3 dd DC, SC in blo, dd DC, SC in blo, 3 dd DC, SC in last. Fasten off and cut the yarn.
Rows 18-19: with A, make a slip knot and attach yarn with a SC to the first St. SC in blo in each St across until the very last St, SC in last St. Fasten off and cut the yarn.
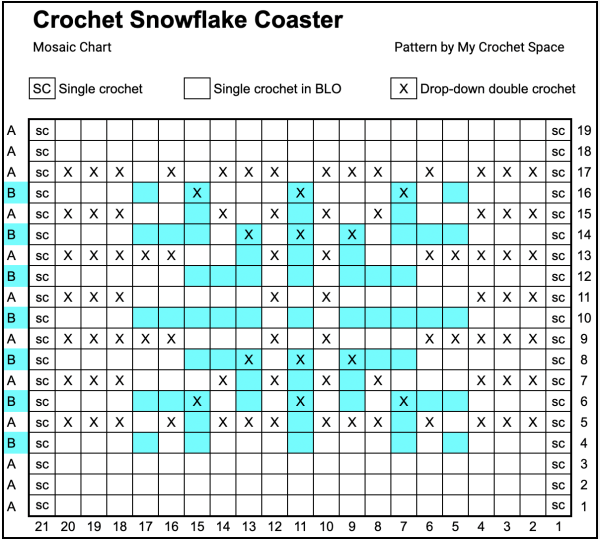
Crochet Snowflake Coaster Mosaic Chart
How to use this chart:
- Read the chart from right to left, from the bottom to the top.
- Row numbers are on the right, from 1 – 19.
- Stitch numbers are on the bottom, from 1 – 21.
- A and B on the left are the two contrasting colours you need to work with for the entire row. Do not change the colour in the middle of the row, it’s one colour per row only.
- A Square with SC in it is a normal single crochet (always at the beginning and end of the row).
- An empty square (any colour) is a single crochet in the back loop only (SC blo).
- A Square with an X in it is a drop-down double crochet (dd DC).
- When reading the chart, only look at the colour in A or B – this will be your colour for the whole row. The colours in other squares are only for the visual representation of how it will look when it’s done.
- You can refer to the written instructions for clarification.
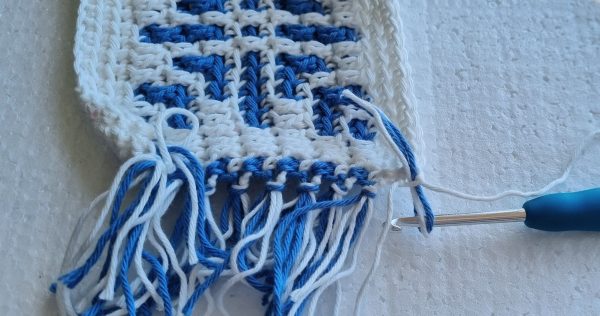
Fringe
First, we need to add more fringe to our coaster and make it look fuller!
Cut both colours into 4-inch pieces. We need 10 pieces of both colours for each side. Take one piece of each colour together, and fold it in half to form a loop.
Insert your hook into the first stitches between the yarn tails from underneath and pull the loop halfway through. Take the two tails on each side (see the white-coloured tails in the picture below) and add them to your tassel. Put all the tails through the loop and tighten the knot.
After you’ve done both sides, cut the fringe to 1.5-inch length or as desired. Go through each knot and tighten it slightly more, pulling on every strand to prevent it from coming undone.
Blocking
This mosaic coaster will need blocking. Blocking simply means wetting the finished project under running water (or using a spray bottle) and then spreading it out on a table in the desired shape.
Make sure you have perfectly straight sides and edges with no curling-up corners, as it will keep that shape as it dries.
I hope you like this little snowflake crochet pattern! Have fun decorating your home 🙂
Get the ad-free & premium PDF pattern with step-by-step photos and written instructions from my Etsy or Ravelry stores. Or get a bundle of three mosaic coaster patterns from Etsy here.
Save this pin to your Christmas Crochet Board for later!
More Free Crochet Coaster Patterns
- Christmas Tree Coaster
- Mug Rug Mosaic Crochet Pattern
- Apache Tears Crochet Mug Rugs
- 35 Free Crochet Coaster Patterns for You to Try
- Thermal Crochet Coaster Pattern
- Crochet Round Coasters
- Modern Square Crochet Coasters