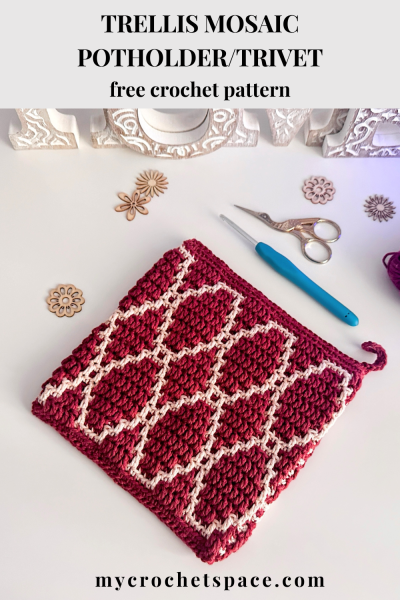
I’ve made a few mosaic crochet coasters and mug rugs before, but this is actually my first mosaic crochet potholder. I’m not sure why it took me so long to make one, because once I got started, I couldn’t put it down!

This time, I made a potholder that’s double thick and worked in the round. I used the overlay mosaic crochet technique.
If you’ve tried this technique before, you’ll know that when you make a flat piece like these coasters, usually you have to fasten off at the end of each row. And this means lots (and lots!) of yarn ends to deal with later.
Sometimes you can work the ends into tassels or make an envelope border to hide them in, but still, it’s not my favourite part of the process.
That’s why I love this design so much. Because it’s worked in the round, there’s no yarn tail problem at all. It saves both yarn and time, making the whole project easier and faster, even though it might sound more complicated at first. Once you get started and have a couple of rounds done, you’ll see how easy it really is.
In this pattern, you’re always working with the right side facing you, round after round, so there’s no turning. And if weaving in ends isn’t your thing, you’ll be happy to know there are very few of them. The ones you do have can be tucked neatly inside the potholder, as long as they’re knotted and secure.
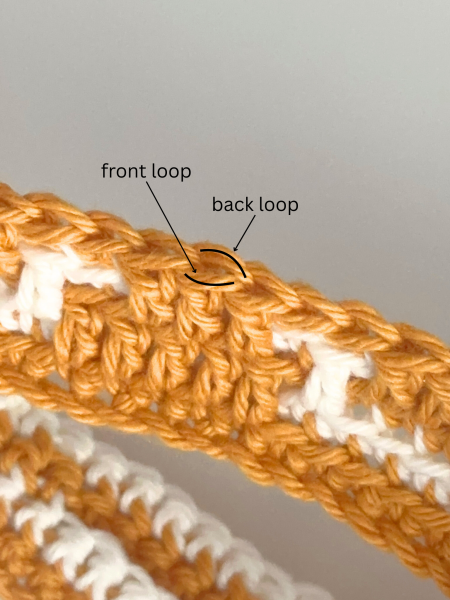
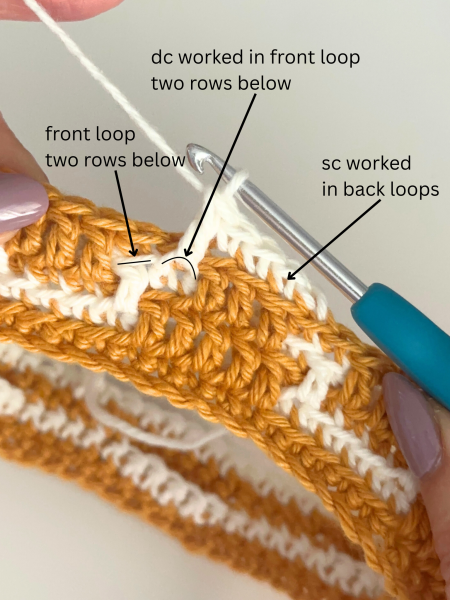
If you’ve tried overlay mosaic crochet before, you’ll know that the single crochets are always worked into the back loops, while the double crochets go into the front loops two rows below. Those longer double crochets cover up the stitches underneath, and that’s how the beautiful colour pattern is created.
Since we’re making this potholder in the round, all colour changes happen at the end of the round when you join with a slip stitch. When you switch colours, make sure your tension is tight. Give the yarn a little pull so everything stays snug and the seam looks tidy.
Mosaic Potholder Crochet Pattern
Get the ad-free & print-friendly version with step-by-step photo and written instructions from my Etsy or Ravelry stores.
Skill level
Intermediate.
Dimensions
7″ x 7″ (18cm x 18cm)
Gauge
10 stitches x 10 rows = 2″ in stitch pattern
Abbreviations (US Terms)
- Ch = chain
- St(s) = stitch(es)
- Sl St = slip stitch
- SC = single crochet
- DC = double crochet
- BLsc = back loop single crochet (single crochet worked into back loop only)
- FLdc = front loop double crochet (double crochet worked into front loop two rows below)
- Colour A (brown) and colour B (white) = any two contrasting colours of your choice
Materials
- Yarn: I used Flinders 100% cotton yarn, light-worsted #3/8ply/DK in colours Natural and Terracotta.
- You can also use worsted-weight yarn #4, you’ll end up with a slightly larger potholder depending on the hook/yarn/tension you used.
- Yarn alternatives: Lionbrand 24/7 (DK), Lionbrand 24/7 (worsted) or Dishie (worsted)
- Crochet hooks: 4.5 mm for the foundation chain and 3.5mm for the rest (if using worsted weight yarn #4, use 5mm for the chain and 4mm for the rest)
- Yarn needle, scissors
Pattern Notes
- Use a larger hook for the chain, as chains tend to be tighter than the rest of the project. Then switch to a smaller hook to create a denser stitch pattern.
- Chain a multiple of 10 plus 1.
- The pattern is worked in the round without turning.
- All single crochets are worked in the back loop only.
- All double crochets are worked in the front loop only two rows below.
- Use one colour per round.
- When connecting rounds with a slip stitch, always connect to the back loop only of the first stitch using the colour for the next round. Chain 1 with a new colour and tighten the joint really well to minimise the seam. See a short video demonstration here.
Crochet Chart
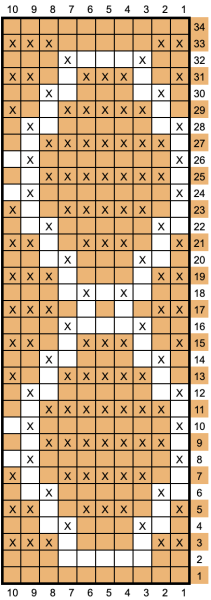
How to use this chart:
- Stitch numbers are indicated across the top and bottom, from 1–10.
- Round numbers are indicated on the right side, from 1–34, where you also see the colour for this round.
- Read the chart from right to left, beginning at the bottom right corner (round 1, stitch 1), and work your way across to the left. Once you’ve completed the first 10 stitches, go back to stitch 1 and repeat stitches 1–10 in the same round. Each round has 7 repeats in total.
- An empty square, no matter the colour, means a single crochet worked into the back loop only.
- A square with an X means a double crochet worked into the front loop of the stitch, always two rows below.
- When following the chart, simply use the colour shown in the box with the round number, then focus on whether the square is empty or marked with an X to know which stitch to make. The colours in the chart are there only to show you how the final design will look.
Written Instructions
With colour A and a 4.5mm hook (5mm if using #4 yarn), chain 71 or any multiple of 10+1.
Row 1 (A): Switch to a 3.5 mm hook (or 4 mm if using #4 yarn). Sc in the second Ch from the hook and in each stitch across (70 sts). With colour B, join the row with a sl st in the back loop only of the first Sc to form a round. Do not twist.
Round 2 (B): Ch 1, BLsc in the first st (the same st as the joining sl st) and in each st around (70 sts in this and every round). At the end of the round, change to colour A and join with a Sl st in the back loop only of the first St.
Note: Starting from Round 3, the instructions are written for one repeat (stitches 1–10). Work this sequence 7 times total to complete the round. Numbers before FLdc or BLsc show how many stitches to make (for example, 2 FLdc means one FLdc in each of the next two stitches). If no number is given, make just one stitch. Each round is finished with a slip stitch in the back loop only of the first stitch using the colour for the next round. Then chain 1 and continue.
Round 3 (A): 2 FLdc, 5 BLsc, 3 FLdc
Round 4 (B): 2 BLsc, FLdc, 3 BLsc, FLdc, 3BLsc
Round 5 (A): FLdc, 2 BLsc, 3 FLdc, 2 BLsc, 2 FLdc
Round 6 (B): BLsc, FLdc, 5 BLsc, FLdc, 2 BLsc
Round 7 (A): 2 BLsc, 5 FLdc, 2 BLsc, FLdc
Round 8 (B): FLdc, 7 BLsc, FLdc, BLsc
Round 9 (A): BLsc, 7 FLdc, 2 BLsc
Round 10 (B): FLdc, 7 BLsc, FLdc, BLsc
Round 11 (A): BLsc, 7 FLdc, 2 BLsc
Round 12 (B): FLdc, 7 BLsc, FLdc, BLsc
Round 13 (A): 2 BLsc, 5 FLdc, 2 BLsc, FLdc
Round 14 (B): BLsc, FLdc, 5 BLsc, BLsc, 2 BLsc
Round 15 (A): FLdc, 2 BLsc, 3 FLdc, 2 BLsc, 2 FLdc
Round 16 (B): 2 BLsc, FLdc, 3 BLsc, FLdc, 3 BLsc
Round 17 (A): 2 FLdc, 5 BLsc, 3 FLdc
Round 18 (B): 3 BLsc, FLdc, BLsc, FLdc, 4 BLsc
Round 19 (A): 2 FLdc, 5 BLsc, 3 FLdc
Round 20 (B): 2 BLsc, FLdc, 3 BLsc, FLdc, 3 BLsc
Round 21 (A): FLdc, 2 BLsc, 3 FLdc, 2 BLsc, 2 FLdc
Round 22 (B): sc, FLdc, 5 BLsc, FLdc, 2 BLsc
Round 23 (A): 2 BLsc, 5 FLdc, 2 BLsc, FLdc
Round 24 (B): FLdc, 7 BLsc, FLdc, BLsc
Round 25 (A): BLsc, 7 FLdc, 2 BLsc
Round 26 (B): FLdc, 7 BLsc, FLdc, BLsc
Round 27 (A): BLsc, 7 FLdc, 2 BLsc
Round 28 (B): FLdc, 7 BLsc, FLdc, BLsc
Round 29 (A): 2 BLsc, 5 FLdc, 2 BLsc, FLdc
Round 30 (B): BLsc, FLdc, 5 BLsc, FLdc, 2 BLsc
Round 31 (A): FLdc, 2 BLsc, 3 FLdc, 2 BLsc, 2 FLdc
Round 32 (B): 2 BLsc, FLdc, 3 BLsc, FLdc, 3 BLsc
Round 33 (A): 2 FLdc, 5 BLsc, 3 FLdc
Round 34 (A): 10 BLsc
After finishing the last round, continue with the same colour (A) to join the sides. At this point, you can cut colour B and secure the yarn tail by weaving it in a couple of times on the inside of the potholder. There’s no need to weave it in neatly to hide it – just make sure it’s secure so it won’t come loose. You can leave the tail long and tuck it inside the potholder.
Joining the sides
With the right side facing you, position the potholder so the seam runs along one side, so it’s less noticeable. Start by chaining 20 for the loop (or ch 1 if you don’t want a loop), then work into the back loops only of both layers and slip stitch them together.

After finishing one side, cut the yarn and secure it on the inside of the potholder. Join the same colour yarn on the other side, Ch 1, and slip stitch along this side in the same way. Make sure all yarn tails are secured so they don’t unravel, and use a yarn needle or your hook to tuck the tails inside. Done! 🙂
I hope you like this crochet pattern! You can get a printable ad-free version of this pattern from my Etsy or Ravelry store.
If you’re looking for more mosaic crochet ideas, check out the free patterns below.