Last updated: June 9, 2026
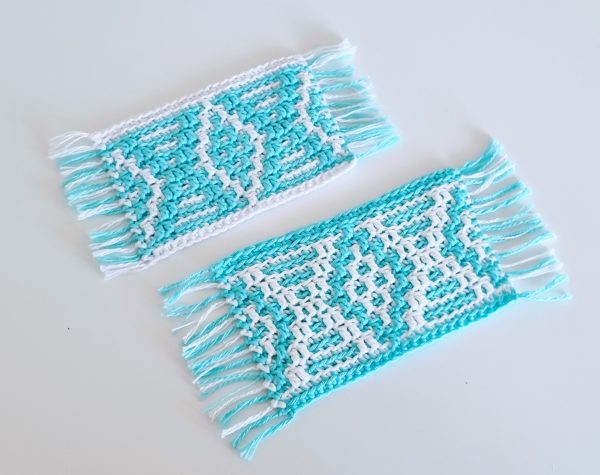
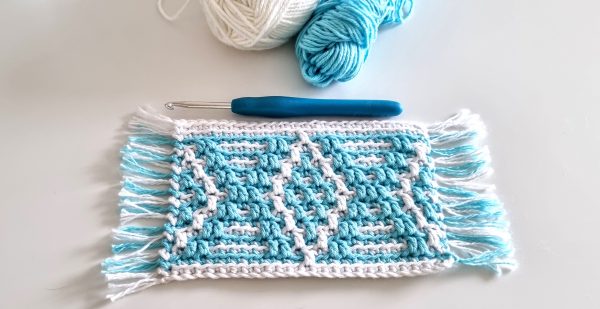
Do you enjoy mosaic crochet? I finished this little mosaic crochet mug rug yesterday and couldn’t wait to share it with you!
I originally designed this mosaic pattern about a year ago and used it in a longer project. For this mug rug version, I shortened the pattern and also flipped the colours around to see how it would look. The difference is subtle, but I think I still prefer the original colour combination.
What do you think? Which version is your favourite? 😊
Scroll down for the free pattern or get the ad-free & print-friendly version with step-by-step photo and written instructions for a small fee from my Etsy or Ravelry stores. The premium PDF pattern has a bonus chart with inverted colours.


If you’re already familiar with overlay mosaic crochet, you can simply scroll down to the chart and get started. 😊
If mosaic crochet is new to you, I recommend taking a few minutes to read through the pattern notes and the section explaining how to read the mosaic chart before you begin. I’ve also included a short video demonstration showing one row of the pattern to help you get started.
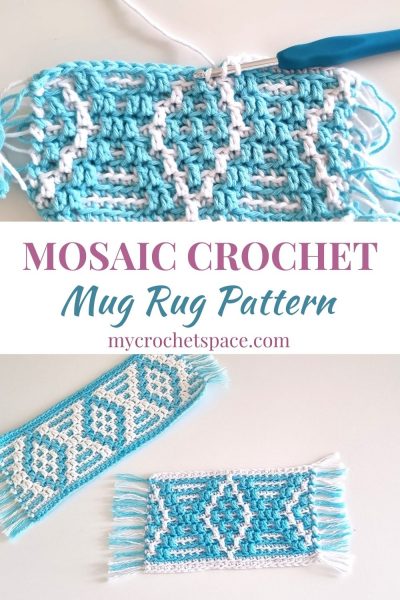
The pattern includes both written instructions and a mosaic chart, so you can follow whichever format you prefer. Personally, I find charts much easier to work from because they give you a clear visual overview of the design and make it easy to see where you are in the pattern, almost like following a map. But if you prefer written instructions, those are included as well. 😊
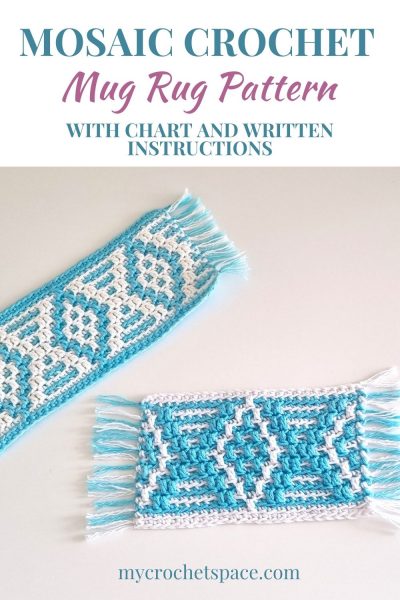
Mosaic Crochet Mug Rug Pattern
Pattern Notes – Mosaic Crochet
- Each row is worked from right to left on the right side (no turning).
- At the end of each row, fasten off and cut the yarn.
- One colour per row. No need to change colour in the middle of a row.
- Each new row starts with a slip knot and joining a new colour to the first stitch in the previous row.
- All single crochets (apart from the first and last) are worked in the back loop only.
- When you have a number in front of a stitch, that means you have to work that many of that particular stitch. For example: 5 SC in blo means you have to work one SC in blo in the next 5 stitches.
- You will have yarn ends on each side of your project. We will use those ends to make a fringe.
Skill Level
Intermediate
Dimensions
Width: 3.75″ (9.5 cm)
Length without fringe: 5.75″ (14.5 cm)
Length with fringe: 8″ (20 cm)
Gauge
9 Sts x 10 rows = 2″ in single crochet in back loop only
Materials
Yarn: I used 100% cotton yarn, light worsted #3/8ply/DK
You can use any type/weight yarn. You’ll need to adjust the size of your hook and may adjust the number of chains and rows.
Crochet hook: 4mm (G)
Scissors
Abbreviations (US Terms)
Ch = chain
St(s) = stitch(es)
SC = single crochet
DC = double crochet
blo = back loop only
dd DC = drop-down double crochet
A and B = any two contrasting colours of your choice
Special Stitches
Drop-down Double Crochet: work a double crochet in the front loop of the stitch 2 rows below. In this pattern, you will work into the same colour front loop 2 rows below as the colour on your hook.
Written Instructions – Mosaic Crochet Pattern
Ch 26 with A
Row 1: with A, SC in second St and across (25). Fasten off and cut the yarn approx. 3 inches away.
Row 2: with B, make a slip knot and attach yarn with a SC to the first St. SC in blo in each St across until the very last St, SC in last St. Fasten off and cut the yarn.
Row 3: with A, make a slip knot and attach to first St. 11 SC in blo, dd DC, 11 SC in blo, SC in last St. Fasten off and cut the yarn.
Row 4: with B, join with SC to first St, SC in blo, 2 dd DC, 5 SC in blo, 2 dd DC, 3 SC in blo, 2 dd DC, 5 SC in blo, 2 dd DC, SC in blo, SC in last. Fasten off and cut the yarn.
Row 5: with A, join with SC to first St, dd DC, 9 SC in blo, dd DC, SC in blo, dd DC, 9 SC in blo, dd DC, SC in last. Fasten off and cut the yarn.
Row 6: with B, join with SC to first St, 2 SC in blo, 2 dd DC, 3 SC in blo, 2 dd DC, 2 SC in blo, dd DC, 2 SC in blo, 2 dd DC, 3 SC in blo, 2 dd DC, 2 SC in blo, SC in last. Fasten off and cut the yarn.
Row 7: with A, join with SC to first St. Sc in BLO, dd DC, 7 SC in blo, dd DC, 3 SC in blo, dd DC, 7 SC in blo, dd DC, SC in blo, SC in last. Fasten off and cut the yarn.
Row 8: with B, join with SC to first St, dd DC, 2 SC in blo, 2 dd DC, SC in blo, 2 dd DC, 2 SC in blo, dd DC, SC in blo, dd DC, 2 SC in blo, 2 dd DC, SC in blo, 2 dd DC, 2 SC in blo, dd DC, SC in last. Fasten off and cut the yarn.
Row 9: with A, join with SC to first St, 2 SC in blo, dd DC, 5 SC in blo, dd DC, 5 SC, dd DC, 5 SC in blo, dd DC, 2 SC in blo, SC in last. Fasten off and cut the yarn.
Row 10: with B, join with SC to first St, SC in blo, dd DC, 2 SC in blo, 3 dd DC, 2 SC in blo, dd DC, SC in blo, dd DC, SC in blo, dd DC, 2 SC in blo, 3 dd DC, 2 SC in blo, dd DC, SC in blo, SC in last. Fasten off and cut the yarn.
Row 11: with A, join with SC to first St, 2 SC in blo, dd DC, 5 SC in blo, dd DC, 5 SC in blo, dd DC, 5 SC in blo, dd DC, 2 SC in blo, SC in last. Fasten off and cut the yarn.
Row 12: with B, join with SC to first St, dd DC, 2 SC in blo, 2 dd DC, SC in blo, 2 dd DC, 2 SC in blo, dd DC, SC in blo, dd DC, 2 SC in blo, 2 dd DC, SC in blo, 2 dd DC, 2 SC in blo, dd DC, SC in last. Fasten off and cut the yarn.
Row 13: with A, join with SC to first St, SC in blo, dd DC, 7 SC in blo, dd DC, 3 SC in blo, dd DC, 7 SC in blo, dd DC, SC in blo, SC in last. Fasten off and cut the yarn.
Row 14: with B, join with SC to first St, 2 SC in blo, 2 dd DC, 3 SC in blo, 2 dd DC, 2 SC in blo, dd DC, 2 SC in blo, 2 dd DC, 3 SC in blo, 2 dd DC, 2 SC in blo, SC in last. Fasten off and cut the yarn.
Row 15: with A, join with SC to first St, dd DC, 9 SC in blo, dd DC, SC in blo, dd DC, 9 SC in blo, dd DC, SC in last. Fasten off and cut the yarn.
Row 16: with B, join with SC to first St, SC in blo, 2 dd DC, 5 SC in blo, 2 dd DC, 3 SC in blo, 2 dd DC, 5 SC in blo, 2 dd DC, SC in blo, SC in last. Fasten off and cut the yarn.
Row 17: with A, join with SC to first St, 11 SC in blo, dd DC, 11 SC in blo, SC in last. Fasten off and cut the yarn.
Row 18: with A, join with SC to first St, SC in blo, across the row, SC in last. Cut the yarn.
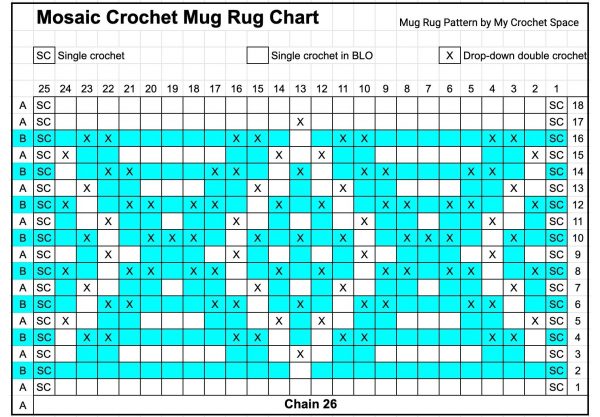
Mosaic Crochet Chart
How to use this chart:
- Read the chart from right to left, from the bottom to the top.
- Row numbers are on the right, from 1 – 18.
- Stitch numbers are on top, from 1 – 25.
- A and B on the left are the contrasting colours.
- One colour per row. You will not change colour in the middle of the row.
- Square with SC in it is a single crochet (always at the beginning and end of row).
- Empty square (any colour) is a single crochet in back loop only (SC BLO).
- Square with an X in it is a drop-down double crochet (dd DC).
- When reading the chart, only look at the colour in A or B – this will be your colour for the whole row. The colours in other squares are only for the visual representation on how it will look when it’s done.
- You can refer to written instructions for clarification.
Mosaic Crochet Short Video Demonstration
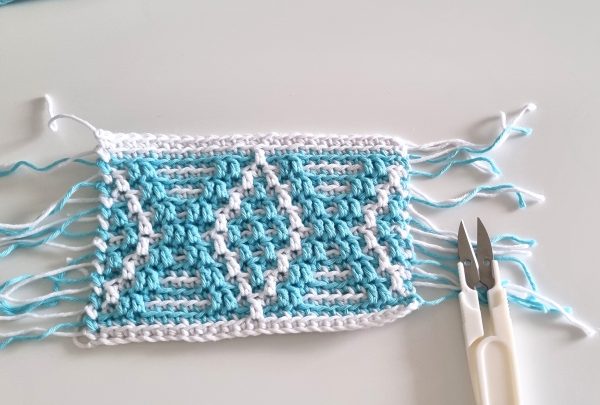
Fringe
Cut the fringe to the desired length, go through each knot and tighten it a little more. Then separate the individual yarn threads for a better & fuller looking fringe!
Blocking
Some crochet projects look much better after they’ve been blocked. Blocking simply means that you wet the finished project under running water and then spread it out on a table (or floor if it’s a bigger project) in the shape you want it to stay. Make sure you really have perfectly straight sides and edges with no curling up corners, as it will dry and keep that shape.
And this is what I did with this mosaic mug rug. As you can see below, before cutting the fringe and separating the yarn threads on the left and after it’s been done and blocked on the right. It just gives it a beautiful finished look!
I hope you like this mosaic crochet pattern! Let me know in the comments below if you have any questions about the pattern!
Get the ad-free & print-friendly version with step-by-step photo and written instructions for a small fee from my Etsy or Ravelry stores, or get a bundle of three different mosaic crochet coasters from Etsy here.
More Free Crochet Patterns
- 12 Free Mosaic Crochet Patterns
- Apache Tears Crochet Mug Rug
- Crochet Snowflake Coaster Pattern
- Tea Spa Crochet Mug Rug
- Crochet Round Coasters
- Modern Square Crochet Coasters
- Single Crochet Cross Stitch – Potholder Pattern
- Top 30 One-Skein Crochet Projects
- Crochet Laptop Case Free Pattern
- 10+ Unusual Granny Square Crochet Patterns
One reply on “Mug Rug Mosaic Crochet Pattern”
I love these Mosaic Mug Rugs! What a bright and pretty project! The crochet chart is helpful too 🙂 Thank you for linking up at our weekly Link Party! You are being featured at our Wednesday
Party #513 this week. Here’s the direct link to the post in case you’d like to share your feature:
https://oombawkadesigncrochet.com/mosaic-mug-rug-teddy-bear-summer-throwback-hair-bow-ties-link-party-513/
Hope to see you again next week! Rhondda