Last updated: November 25, 2025
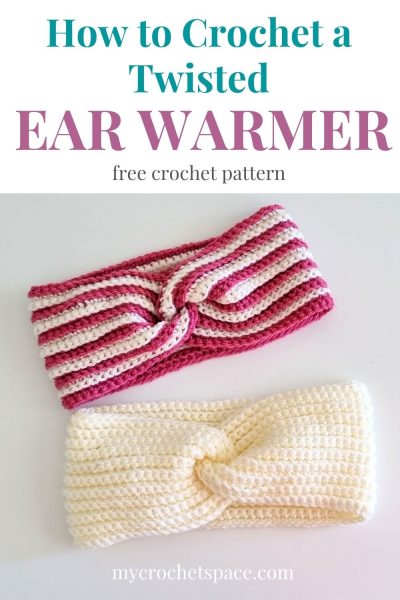
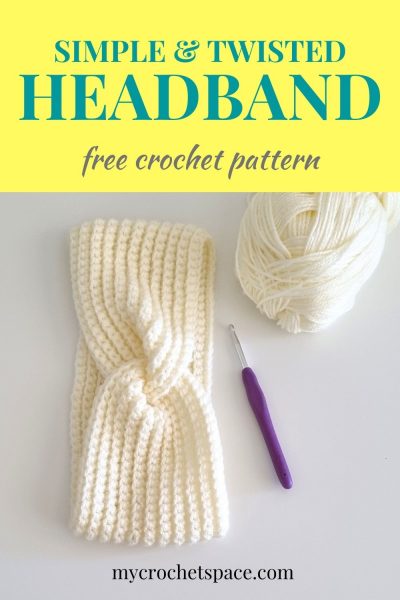
This is a simple, twisted crochet ear warmer headband pattern that is suitable for beginners!
Learn how to make these cozy, yet stylish ear warmers that are perfect for keeping your ears warm this winter. This is an easy and fun beginner crochet project, and if you’re an experienced crocheter, you’ll be able to work up a couple of crochet headbands in no time!
This post may include affiliate links, view my disclosure policy for details.
Twisted Crochet Ear Warmer
If you’re completely new at crochet check out my Step by Step Tutorial for absolute beginners where you can learn how to crochet the basic stitches!
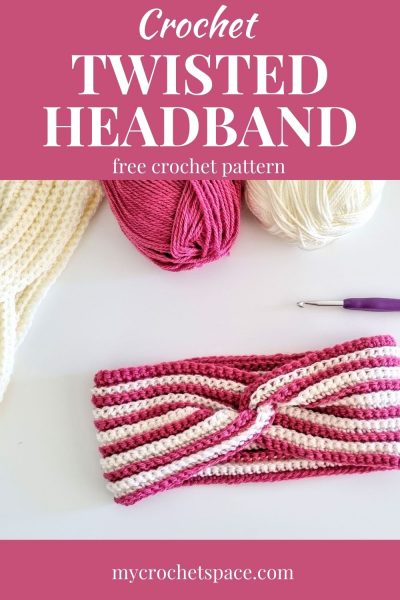
This twisted headband is made with light worsted #3 acrylic yarn. You can use any type of yarn for this headband. I normally use acrylic yarn, and nowadays you can find all kinds of beautiful, soft and very pleasant to touch acrylic yarn.
If you use a cotton blend yarn, it might stretch differently. Normally, cotton or cotton blends don’t stretch as much. So you’ll need to adjust the stitch count for your foundation chain.
The best part for beginners or anyone who doesn’t like working in the round is that this crochet pattern is worked in rows. You’ll simply need to make a rectangle and then stitch the sides together. The twist is made in the way the two sides are connected. Like with most things, it’s very easy once you know how to do it!
Twisted Crochet Headband Free Pattern
Skill Level
Easy
Dimensions
Width: 4,5″ (11.5cm)
Length when assembled: 10″ (26cm)
Gauge
16 Sts x 20 Rows (in pattern)
Materials
- Yarn: Any light worsted #3 yarn
- Crochet hook: 5mm
- Scissors
- Yarn needle
Abbreviations (US Terms)
Ch – chain
St – stitch
SC – single crochet
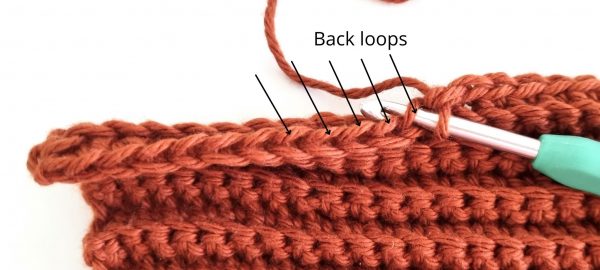
BLO – back loop only
Special Stitches
Single crochet in back loop only (SC in BLO): Insert hook in next stitch (back loop only) and work a single crochet.
Crochet Ear Warmer Pattern Notes
Ear warmer is worked lengthwise by chaining an amount for the length (the circumference of your head). You can adjust the size by chaining more or less for larger or smaller sizes.
Ch 1 at the beginning of a row does not count as a stitch.
Work as many rows as you like until you reach your desired width.
How to make the right size
Measure your head with a tape measure and write down that number so you won’t forget it. Generally, you would need to make a headband 2-3 inches shorter than the head circumference as the headband will stretch. For example, if your head circumference is 22 inches, you’ll need to make a headband that is 20 inches in length. However, depending on your yarn and the type of stitch you are using, it will stretch differently.
If you’re making it for yourself, chain a number of chains until it fits around your head snuggly.
If you’re making it for someone else and you can’t measure – check the average head circumference below.
Average Head Circumference
Women: Small = 21″ (53cm), Medium 22″ (56cm), Large 23″ (58.5cm)
Men: Small = 22″ (56cm), Medium 23″ (58.5cm), Large 24″ (61cm)
For child/teen sizes, see the detailed chart on the Craft Yarn Council’s website.
Twisted Ear Warmer – Free Pattern
- Ch 81 or until you reach approx. 20″ (for a 22″ head circumference)
- Row 1: Working on the back side of the chains, SC in second Ch from hook and every Ch across. (80)
- Row 2-22 or until you reach your desired width: Ch 1 and turn. SC in BLO of the first St and and every St across the row. (80)
Colour changes for stripes: If you decide to use two colours, change colour every two rows.
Assembling
To make the twist, please go to the section How to Make the Twist in this blog post, or alternatively, you can watch this video demonstration of a crochet Ear Warmer / Winter Headband (skip to 3:30). It’s a different crochet pattern, but the twist is the same.
Fasten off and weave in ends.
I hope you like this simple crochet headband pattern! If you make one for yourself, share it on Instagram and tag me @my_crochet_space. I would love to see your makes!
More Easy Crochet Patterns:
- Ocean Breeze Crochet Headband
- Crochet Ear Warmer / Winter Headband – Free Pattern
- Crochet Men’s Scarf Cool Ombre
- Ocean Breeze Crochet Scarf with Fringe
- Crochet Easy Cowl Pattern
- Crochet Knit-Look Infinity Scarf
- Crochet Fingerless Gloves – Easy Crochet Pattern
- Houndstooth Crochet Headband – Canyon Ridge
8 replies on “Simple Crochet Ear Warmer Headband- Free Pattern”
I liked your page a lot , can you download videos please
I’m happy you like it! I plan on making more videos in future 🙂
I Love the headband
Happy to hear that, Beverly! 😊
can you use forested weight yarn this?
Hi Mary, yes, you can definitely use worsted weight yarn! Since it’s a bit thicker, you might need to start with fewer chains. Just chain until it fits snugly around your head—that’s the easiest way to get the right size.
can you use #4 acrylic yarn ? Thanks
Yes, you can! Just follow the instructions in the pattern to adjust the size. 😊